
How to Make a Heart Shaker Card: A Fun and Easy DIY Tutorial

Make This Fun and Romantic Heart Shaker Card!
There’s something magical about a handmade card; when it shakes and sparkles, it becomes even more special! Whether you're crafting for Valentine’s Day, an anniversary, or sending a little love to your special someone “just because,” this sweet Heart Shaker Card adds a unique interactive element that makes any occasion extra memorable!
The best part? It’s just as fun to make as it is to give! From choosing shaker fillers like sequins or tiny confetti to layering the pieces together, this project lets you play with textures, colors, and dimensions—all while creating something truly heartfelt. Whether you're crafting solo for a relaxing creative session or making it a fun DIY activity with a friend or loved one, this Heart Shaker Card Project will surely bring joy from start to finish!

Make this super cute card for free and get the matching add-on envelope in our Shop!
Why You’ll Love This Project:
A Handmade Gift from the Heart – Nothing says "I love you" like a thoughtfully crafted, handmade card. This heart shaker card is a beautiful way to show someone just how much they mean to you!
Interactive & Memorable – Unlike a store-bought card, this design features a fun shaker element that adds an extra touch of joy and surprise—making it a keepsake they’ll treasure.
Perfect for Any Special Occasion – Whether it’s for Valentine’s Day, an anniversary, or just because, this card is a heartfelt way to send love, appreciation, and a little bit of handmade magic to your special someone!
We’ll be using the free Heart Shaker Card Project freebie from the Freebie Vault, and I’ll also show you some more fun designs for the shaker card using the Heart Shaker Card Kit Add-On Pack from the Coffee in My Kitchen Shop.
With step-by-step instructions and detailed photos, we’ll guide both Cricut users and hand-cut crafters, ensuring everyone can join in the fun!
Are you ready? Let’s start crafting!
Table of Contents:

Make two more beautiful and fun Heart Shaker Cards available in our Shop!
Supplies List:
3 - 4 sheets 8.5x11 in. White Cardstock Paper – I like Neenah Vellum Bristol 67lb/147gsm Cardstock paper from Amazon or the Astrobrights Bright White 65lb/176gsm Cardstock paper from Walmart
1 sheet – 12x12in White Cardstock Paper 65lb/176gsm for the Card Base – you can also use a 8.5x11in cardstock sheet, just make sure to change the paper size in Design Space before cutting.
1 sheet – 8.5x11in Acetate Sheet – I use one with a 7 MIL thickness from Amazon.com
Red or Pink Cricut machine compatible pen – I used the Cricut Extra Fine Point 0.3mm Pen in Burnt Red/Red in Design Space
Fine Detail Cutting Scissors, and/or a Paper Cutter, and/or a Detail Craft Knife
Bone Folder Tool - or you can use the Cricut Stylus if you like!
Double-Sided Foam Tape Strips 0.12 in. wide & approximately 5.9 in. long from Amazon.com
Glue with a precision Glue Tip or Double-Sided Tape – I use Bearly Art Glue and AdTech Tape Glue Runner both found on Amazon.com
A variety of sequins or other shaker fillers - I used red, pink, and holographic sequins from Amazon.com
Anti-Static Pillow (found at craft stores or Amazon) or a homemade version with a sock filled with some cornstarch!
For Cricut Machine Users:
Cricut Machine with Print Then Cut Feature (All machines except the original Joy machine – the Cricut Maker 3 was used in this project.)
Blue Light Grip Mat
Scoring Stylus or Score Wheel (I use a stylus in this project)
Brayer Tool
Weeder Tool
Tweezers
Template #004 is inside the Coffee in My Kitchen Freebie Vault. Enter the Vault HERE or fill out the form below to get the FREE password!
Optional Upgrade:
Want more creative options? The Heart Shaker Card Kit Add-On includes extra card designs, sentiments, and matching envelopes for even more fun! Get your kit at the Coffee in My Kitchen Shop HERE!

Heart Shaker Card Instructions
Part One: Instructions for Cricut Crafters
Step One - Create the Shaker Card in Design Space
The Card Base
We’re going to start this project by uploading the Card Base SVG file of the shaker card from the Heart Shaker Card Project folder.
Open Cricut Design Space and click New Project to open up a new Canvas.
Click the Upload button on the left panel. Click Upload Image and then Browse.

Locate the Heart Shaker Card Project folder on your computer and double-click to Open. Select the Heart Shaker Card SVG Templates folder and double-click to Open. Select the Card Base SVG file and click Open. (If you need assistance downloading and opening the zip file, see our helpful FAQs article HERE!)
The file will appear in the Upload Preview—click Continue, then click Upload.
Your SVG design will now be on the Design Space canvas, ready to resize!

Now, we’re going to resize the card base. In the Top Menu Panel, click the Lock icon to “unlock”. Under the Size option, resize the card base to 8.5 in W and 5.5 in H.

Next, we will change the straight cut line in the center of the card base to a Score Line. At the top of the Layers Panel on the right, click on the Ungroup icon to ungroup the card base and line.

Click on the Line to highlight it.
In the Top Menu Panel, under Operation, open up the drop-down menu, and select Score. This will change the line to a dotted-score line.

Now, highlight both the card base and the score line and click Attach in the bottom of the Layers Panel. Now Design Space will read the combined image as a “cut the rectangle and score the folding middle line”. Yay!


The Sentiment
We’re going to repeat the upload instructions from above to grab our card sentiment. Select the Sentiment SVG file and click Open, then click Continue and Upload to add it to the canvas.

Make sure the Lock icon is in the “unlocked” position, then resize the sentiment to 3.3 in W and 0.73 in H.

Now, we will add the Pen action to the sentiment so that Design Space knows where and with which color pen to write our sentiment.
First, Ungroup the sentiment image in the Layers Panel.
Then, highlight the sentiment text ONLY and go up to Operation in the Top Menu. In the drop-down, select Pen. Then, click on the color box next to the drop-down, and select both the size and color of the pen you’d like to use for your sentiment. This action will change the sentiment text to the correct pen color. (I chose XF - Extra Fine Point (0.3mm) in Red.)

Then, highlight both the sentiment and the background image and click Attach. Now Design Space knows where to “write” and where to “cut” for this image.

The Card Panels & Acetate Template
Repeat the above upload instructions to add the Card Panels and Acetate Template SVG file to the canvas.

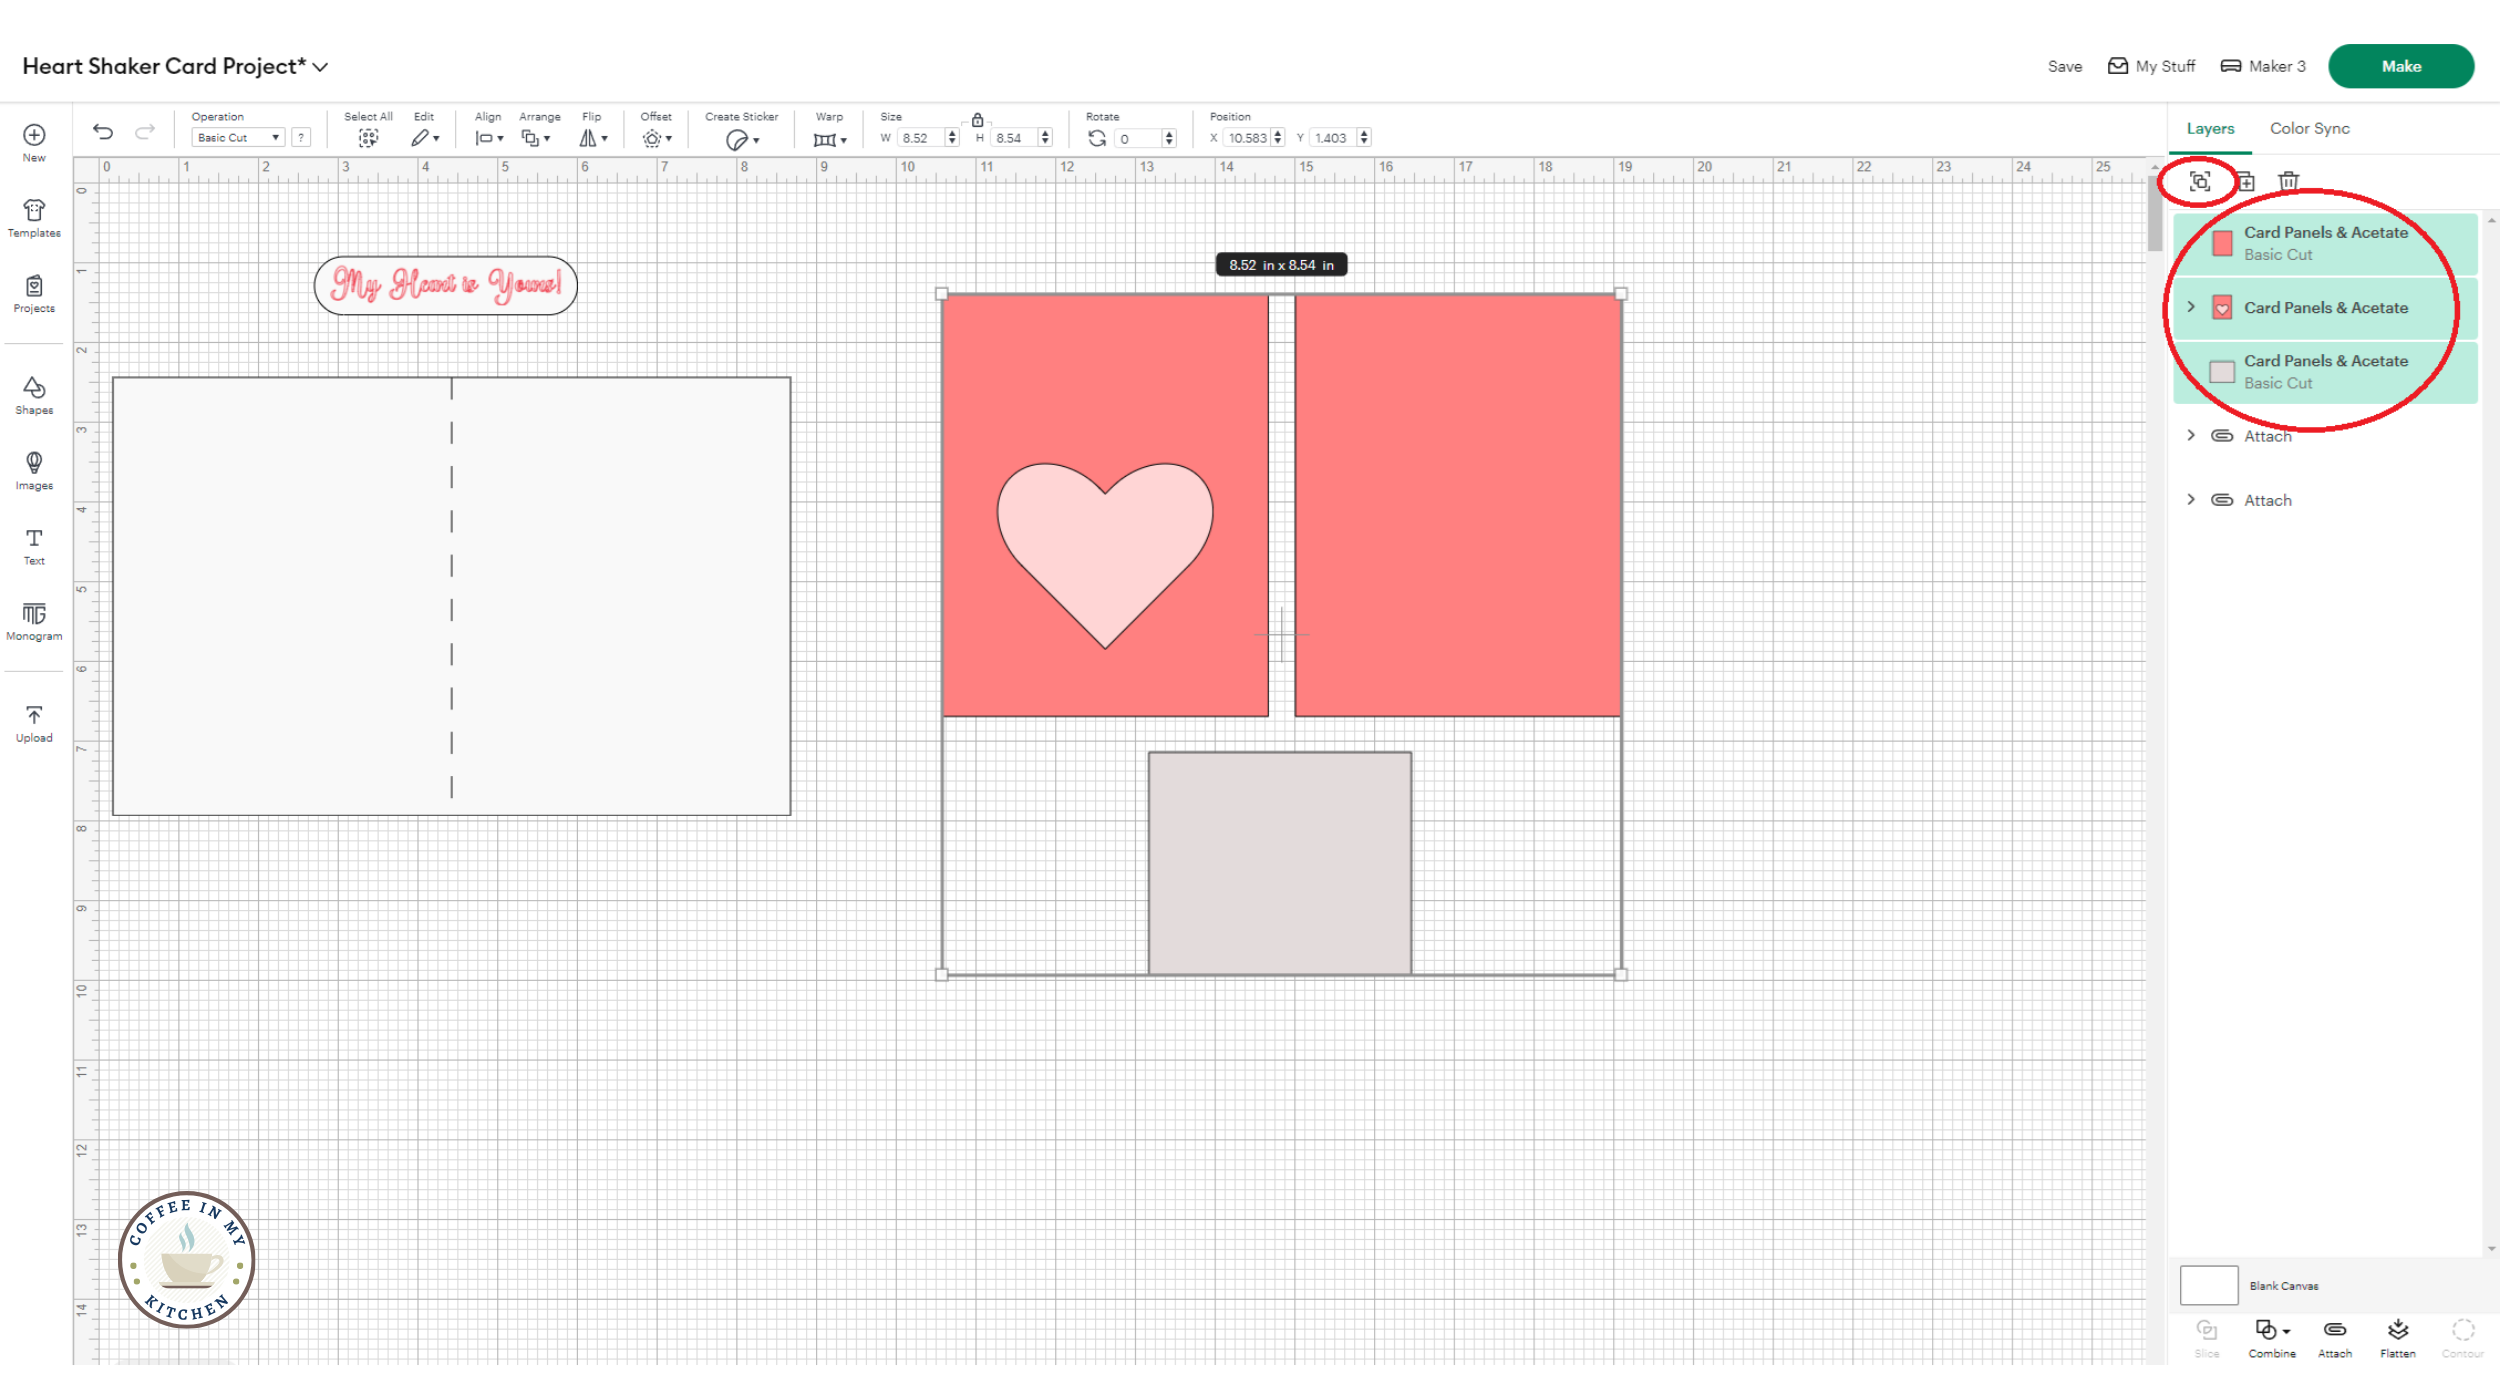
With the Lock icon “unlocked,” resize the card panels and acetate file to 8.52 W and 8.54 H.

Ungroup the card panels and acetate file. You won’t need to do anything more to the solid card panel and the acetate file until it’s time to cut.
NOTE: the card panels should each measure 4.09 in W and 5.29 in H, and the acetate should measure 3.29 W and 2.8 H. You can double-check the sizing before the final cut.
The Heart Pattern Paper
It’s time to upload the heart pattern paper file to our project! The upload directions for a pattern are a little different than uploading an image like we’ve done before.
Click on the Upload icon on the left panel. On the next Upload page, click the Pattern fill option (not Image), then Upload Pattern.

Select the Pattern Paper JPG file from the shaker card folder, and click Open.

Once the Pattern Paper file has opened in Design Space and this screen below appears, click the Upload button in the bottom right-hand corner to add the pattern to the pattern bank.

Design Space will automatically take you back to the Upload Page. It might take a few minutes, but you’ll see this message “Pattern Upload Successful” once Design Space has finished loading the pattern page. Click Cancel at the bottom of the page to return to the canvas.

This is the fun part where we get to turn one of the card panels into our heart pattern paper design!
Select the card panel with the heart shapes on the right, and click on Ungroup in the Layers Panel.

Click on just the card panel, and go up to the Operation option in the top menu. In the drop-down, scroll down and select Print, then Cut.
Next, click on the Print type drop-down and change it from Color to Pattern.
You’ll see the heart pattern paper you uploaded to the pattern bank earlier. Click on that paper, and the card panel will change into the red watercolor pattern - pretty cool!
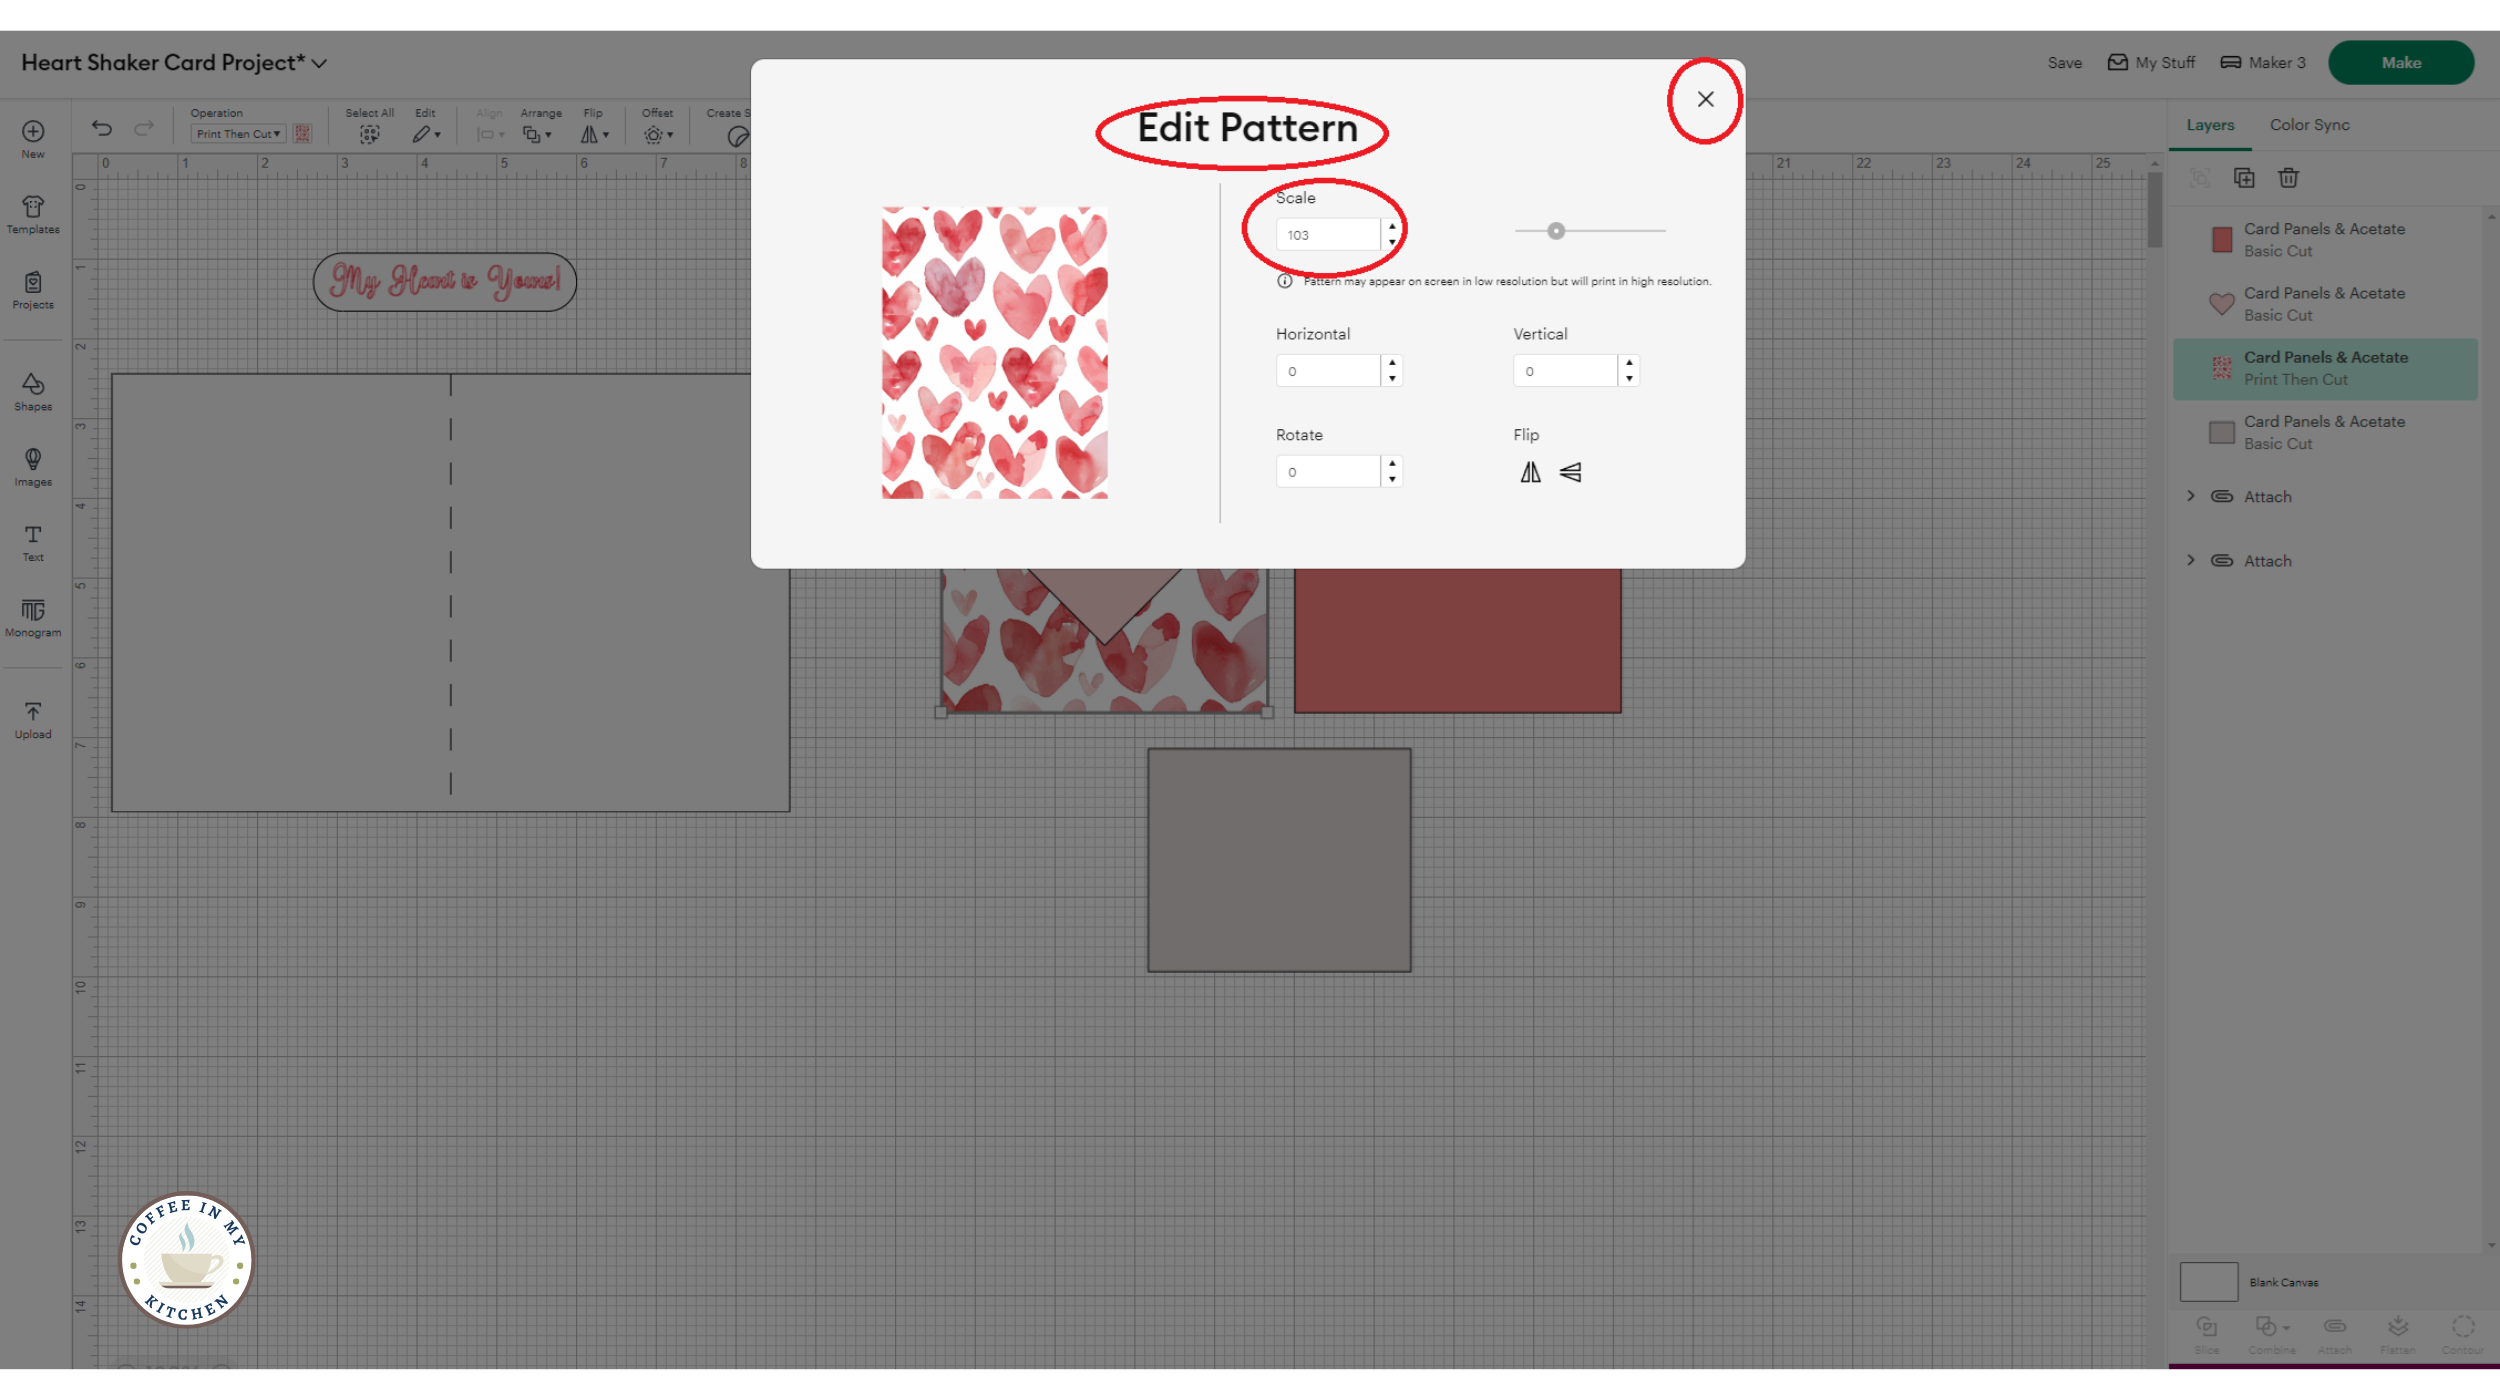
Then, click on Edit Pattern at the bottom of the Print type box.

In the Edit Pattern box, click on the Scale, then type in the number 103. Or you can use the toggle next to the number box to move the numbers up to 103 if you like. See how the pattern gets larger or smaller depending on your selected numbers!
NOTE: because this is NOT a seamless pattern paper design (it’s an 8.5 x 11in paper size vs a 12 x 12 in paper size), there will be edges shown in the pattern box. Making the size of the pattern paper around 100+ spreads out the pattern enough to keep the edges outside of our project dimensions. Feel free to play around with the pattern sizing and see what you come up with!
When you’re satisfied with the pattern size, click the X to exit the Edit Pattern box.
Highlight both the pattern card panel and the heart shapes, and click Attach in the Layers Panel. Now, Design Space will know what part of the card panel to Print the pattern on and where to cut out the heart shapes. Awesome!

Repeat the above instructions to turn the second card panel into a pattern paper image. This panel will be at the back of the clear acetate, creating a 3D effect for our final card design!

Yes! Now you have all the pieces for the heart shaker card project on the canvas! Click Save and give the project a name that you like, or copy mine from below.
Finally, click Make!

Step Two - Prepare the Mats and Materials
In the Mat box, select On Mat for any material and Mat Size at 12 x 12 in. Click Confirm.

On the Prepare screen, check the order in which Design Space will print and cut out each image. Gather your supplies, and put the white cardstock papers and acetate sheet in this order now to prevent any mix-ups as you move your cardstock and mats during the cutting phase. Click Continue when you’re ready to go!

Follow the prompts on the next screen to connect your Cricut machine to your computer.
Load a piece of white cardstock into your printer and click Send to Printer. When the Print Setup box comes up, select your home printer, then make sure that both the Add Bleed option and the Use System Dialog option are toggled ON.
NOTE: The Add Bleed option adds a slight print outline to each element, which causes the Cricut machine to cut a little extra around each piece. Some Print then Cut projects don’t require this little outline, but it’ll work well for our project today. Feel free to play around with this option if you’d like to see how it works with your Print then Cut projects in the future!

When the System Dialog box comes up, click on Preferences. This will open up another print option box where you can select the print quality for this print.

I like to select Best for the Print Quality when printing out a project in color. You can also look for Highest DPI or Highest Quality under the Advanced tab, depending on what kind of printer you have.
For more printer tips for Print then Cut crafts, see the FAQs article HERE!

Once you’ve selected your print quality, follow your printer prompts to print the page!
While the printer works on the elements page, Design Space will pop up an info box telling you how your final printed page should look with the black corner guides.
Once the page is finished printing, compare it to the info box. If it looks good, click Continue to move on to the next step.
If the page doesn’t look right or the black corners aren’t aligned correctly, you can go to Cricut.com and search for their Print then Cut troubleshooting tips. I recently had to follow the steps to realign my Maker 3 machine, which helped with my print projects!

To begin the cutting phase, select Light Cardstock - 65lb (176 gsm). If you don’t have it already bookmarked, select Browse All Materials and scroll down the menu until you get to the Paper category. You’ll see the Light Cardstock option there, and you can click on the bookmark icon to save it to your main menu for future projects.

Now, follow the prompts in Design Space to prepare the Cricut machine for the cutting process.
I keep my Pressure on Default for my Fine-Poin blade, but you can select More in the drop-down menu if you have an older or dull blade. This will help the blade to cut cleanly around the bookmark and other project pieces.

Take the light grip mat and the first piece of white cardstock with the bookmark elements printed. Carefully line up the paper within the mat grid and press down, using the brayer tool to firmly smooth and secure the paper to the mat.

When prompted, load the mat into the machine for alignment and press the blinking Load/Unload button. When the machine is ready, press the Play button. Now, you can sit back and relax while the machine goes through its cutting process!
When the cut is finished, press the Unload button to release the mat from the machine.

Continue following instructions to unload and load each mat, matching the cardstock and acetate paper with each color mat in Design Space. Follow the above printer directions again if needed for the second Print then Cut page.
Follow the directions for adding the Score stylist or Scoring Wheel to the Cricut machine.

Follow the directions for adding the pen for the drawing function on the Sentiments piece.


For the Acetate material, I went into Browse All Materials and selected the standard Acetate material (not the Foil Acetate).

NOTE: The Cricut machine automatically makes two passes on the acetate cut. However, I found my acetate material was too thick for only two passes to cut through, so I redid the cut and adjusted my blade pressure to More instead of Default. And it cut through beautifully!
You may need to adjust your blade pressure and multi-cut if necessary, depending on the thickness of your acetate sheet.

Step Three - Assemble the Shaker Card Pieces
As the materials are being cut out, carefully remove the excess paper from each design and the mat. I find it easier to bend and gently roll the mat away from the paper and acetate instead of pulling the paper away from the flat mat.
Use the weeder tool and the tweezers to help remove the smaller pieces from the mat.


Now comes the fun part! Gather the rest of the shaker card supplies, and let’s put this card together!
Part Two: Instructions for Hand-Cut Crafters
Step One - Download & Print the Heart Shaker Card Printable Templates
Locate the Heart Shaker Card Project folder on your computer. Open the folder and go to the Heart Shaker Card Printable Templates Folder. Once there, print out all three printable JPG files onto white cardstock.
If you need assistance opening up the project zip folder, printing the JPG files or would like to know best print practice info, check out our FAQs article HERE!
Step Two - Cut Out the Card Template Pieces
Use detail-cut scissors and/or a paper cutter and/or a detail craft knife to cut out the card and sentiment templates. I used a paper cutter for the long pieces and a mix of my scissors and craft knife for the small pieces.
NOTE: Use the white templates and black ink sentiment to print onto color cardstock for another cute card option!


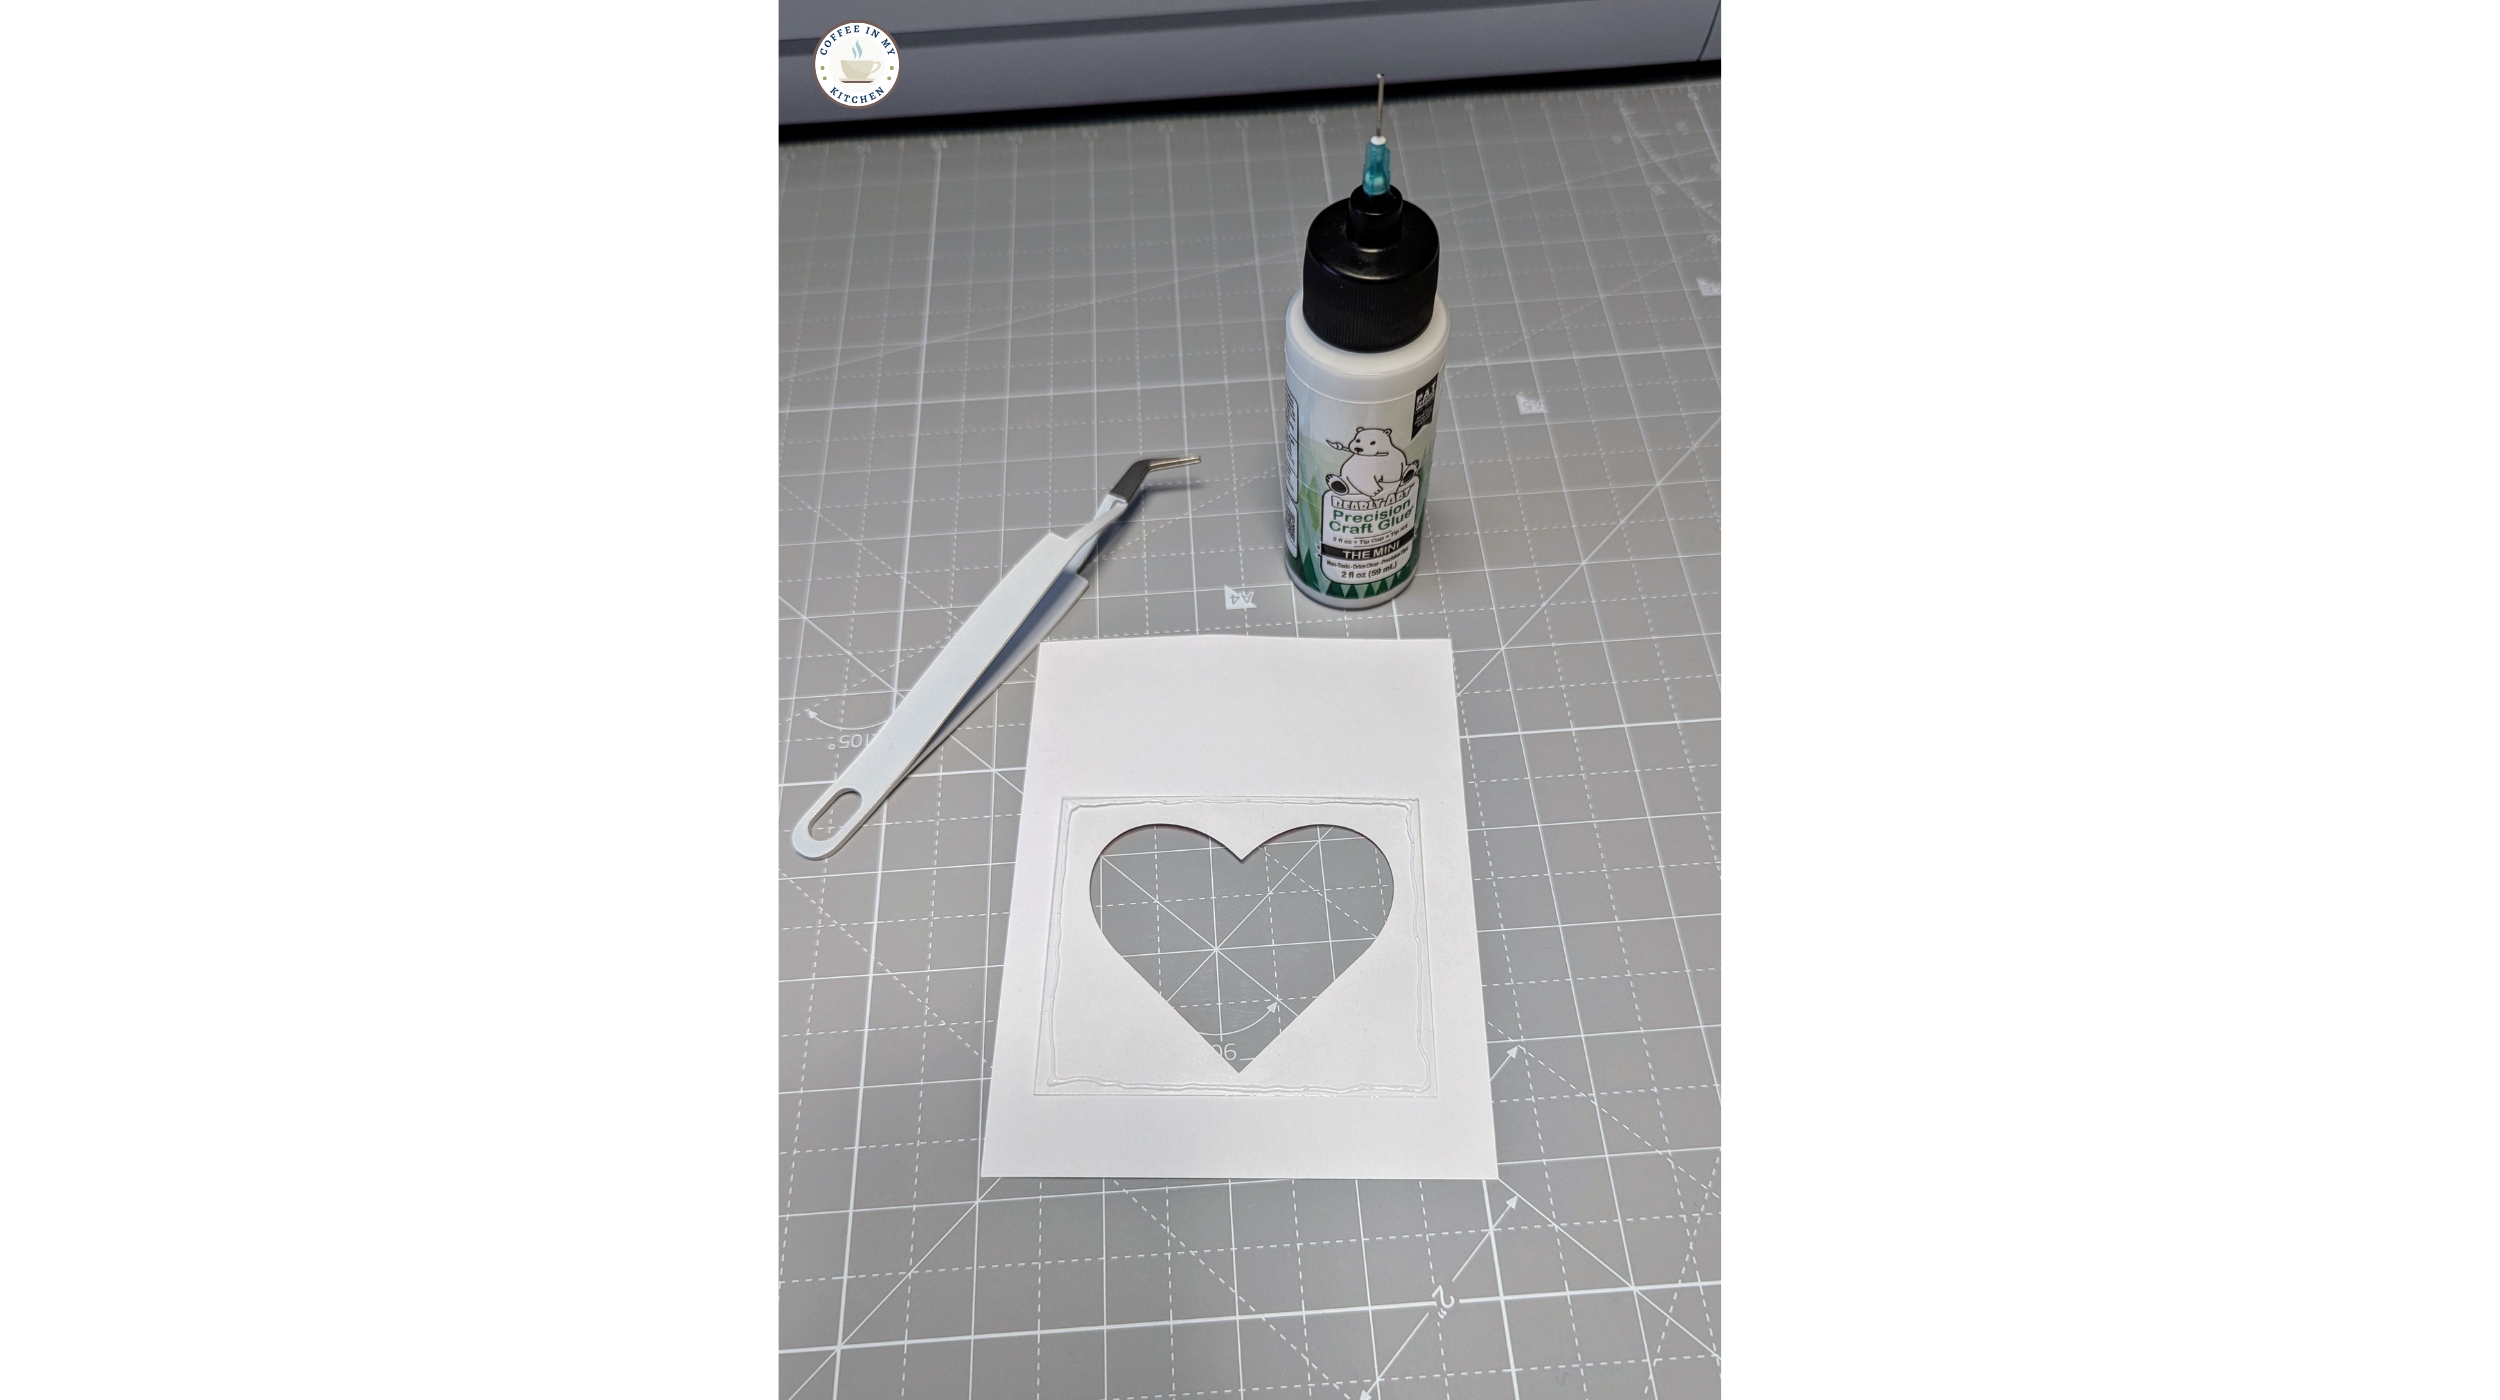
Take the white template pieces for the front card panel, the acetate piece, one of the pattern papers, and an acetate sheet. Use a pencil to trace inside the heart shape onto the pattern paper. Use a thick pen or marker to trace the acetate piece - I used a black permanent marker, and it worked great!

Cut out the traced shapes with either scissors or a craft knife. I used scissors for the acetate sheet and a craft knife for the heart shape.

Take the bone folder tool and the card base, and use the bone folder to score the middle of the card base sheet. Use the scoring lines as a reference. You can place a ruler down the scoring line and use it to push the bone folder tool against while scoring to ensure a straight line.
Bend the card in half and smooth down the middle fold with the bone folder.

Now comes the fun part! Gather the rest of the shaker card supplies, and let’s put this card together!
Part Three: Final Card Assembly Instructions for All Crafters
Step One - Putting the Shaker Card Together!

Gather all the heart shaker supplies. If you used the Cricut pen to draw the sentiment, feel free to color the sentiment in with the same pen.

Take the glue, front heart card panel, and acetate square piece. Flip the card panel over and lay the acetate piece over the top of the heart-shaped cut-out.
Squeeze a small line of glue right inside the edge of the acetate square and move it around the edge, creating a square of glue.
With tweezers, if needed, flip the acetate piece over and place it glue-side down over the heart-shaped cut-out. Press down gently, wiping up any glue that might have squeezed out the edges.


Take the Anti-Static Pillow or sock with cornstarch and brush it over the acetate square. This handy trick applies a fine dusting of powder to neutralize static on the acetate piece and helps the sequins not stick to each other. Pretty cool!
Then, take the strips of double-sided foam tape and, with the scissors, cut small pieces to fit around the edge of the heart-shaped cutout. This creates a barrier between the acetate piece and the back panel of the card, keeping the sequins inside the heart shape.
Take longer strips of foam tape and place them around the edge of the card panel. This will create a sturdier base for the card and prevent the outside of the panel from becoming squashed or ripped off. When finished, it will also add a lovely 3D effect to the card!


Take the sock duster or anti-static pillow and carefully wipe inside the heart shape one more time.
Get out the sequins and sprinkle a few pieces of each color inside the heart cut-out. Feel free to play around with how many sequins you’d like to have, just make sure they can move around easily!
Once the sequins are inside the heart, carefully remove the top protective, non-sticky paper layer from the foam tape pieces. Use tweezers if needed.
NOTE: the sequins are very light and could “jump” out of the heart cut-out if the card is jostled, so be careful not to move the card around too much when removing the protective foam tape layer.
Take the back card panel and flip it face-side down. Carefully line the back panel edges up with the front card panel edges and lay the panel down, pressing down firmly to adhere it to the foam tape.


Take the card sentiment, the foam tape, and the scissors. Cut two small pieces of tape to fit the back of the sentiment and place the pieces down firmly on the cardstock.
Take the protective paper layer off the foam tape strips and flip the sentiment over. Line up the sentiment piece on the front card panel above the heart shape, and place it down, pressing firmly to adhere the foam tape to the card.

Finally, take the white card base, the shaker card panel, and the glue. Flip the panel over and carefully apply a thin layer of glue all over the back of the card.
Flip it back over, and center the panel with the center of the card base. The panel is a little smaller than the card base and will fit with a margin of the card base sticking out around the panel, creating a nice white border.
Press firmly on the panel and card base to adhere both pieces together.


And congratulations, you did it!!! You just made a beautiful heart-themed shaker card! Go ahead and shake it for a bit - have fun!!!
Remember, for extra crafting fun, check out the Heart Shaker Card Add-On Kit in the Coffee in My Kitchen Shop. This fun card kit has extra goodies for the card you just made, like a matching envelope, ephemera embellishments, and two more beautiful heart-shaker card designs! Grab your Add-On Kit HERE!


Conclusion & Next Steps:
Wrapping Up: Let’s Stay Connected!
I hope you had as much fun making this Heart Shaker Card as I did! Handmade cards are such a thoughtful way to share love and creativity, and I’d love to see how yours turned out. Whether you followed the tutorial exactly or put your own unique twist on it, I’d be thrilled if you shared your creation!
Tag me on Instagram or Facebook with @coffeeinmykitchen or post your project in our private crafting Facebook group—it’s a wonderful space to connect with fellow crafters, share inspiration, and get ideas for future projects.
Looking for more creative projects, freebies, and exclusive craft ideas? Be sure to sign up for my weekly newsletter through the Vault Box below to get all the latest updates, tutorials, and special goodies straight to your inbox.
Want to explore more digital crafting supplies? Check out my shop for more digital paper packs, card kits, and printables to inspire your next project.
Happy crafting, and I can’t wait to see what you create!