
“Easy Winter Craft: DIY Cozy Pink Winter Reads Bookmark”

Make This Cozy Pink Winter Reads Bookmark!
Winter is the perfect season to curl up with a good book, and what better way to add a touch of creativity to your reading routine than with a handcrafted bookmark? In today’s post, we’ll be making the Cozy Pink Winter Reads Bookmark—a simple and fun project that’s perfect for all skill levels!
Whether you’re a Cricut enthusiast or prefer to craft by hand, this project has you covered with step-by-step instructions for both methods. Using our charming Cozy Pink Winter Reads Bookmark Project, you’ll create a beautiful, personalized bookmark to keep your place in style!

Why You'll Love This Project:
A Creative Outlet for Busy Days: Whether you're unwinding after work or looking for a peaceful weekend activity, this craft lets you express yourself and enjoy the satisfaction of creating something with your own hands.
Quick and Fun: This bookmark is easy to make, requiring just a few materials and about 30 minutes of your time. It’s perfect when you need a creative boost but don’t want to commit to a long project.
Beautiful and Gift-Worthy: Our bookmark project features a pink pastel watercolor design paired with a deep, rich brown and baby pink cardstock that creates a soft, dreamy vibe. Plus, it makes an excellent gift for fellow book lovers and book club members!
Today, we’ll show you how to use our free template pack from the Freebie Vault to create two variations of this beautiful bookmark. With step-by-step instructions and detailed photos, we’ll guide both Cricut users and hand-cut crafters, ensuring everyone can join in the fun!
Are you ready? Let’s start crafting!

Supplies List:
2 - 3 Sheets of 8.5x11 in. White Cardstock Paper – I like Neenah Vellum Bristol 67lb/147gsm Cardstock paper from Amazon or the Astrobrights Bright White 65lb/176gsm Cardstock paper from Walmart
1 Sheet of 12x12 in. or 8.5x11 in. 65lb/176gsm Light Pink Cardstock Paper
1 Sheet of 12x12 in. or 8.5x11 in. 65lb/176gsm Brown Cardstock Paper
1 - 8 1/2 in. Strand of 1/8 inch Satin Ribbon in Brown
Fine Detail Cutting Scissors
Double Sided Foam Tape Roll or Tabs ½ inch wide
Glue with a precision Glue Tip or Double-Sided Tape – I use Bearly Art Glue and AdTech Tape Glue Runner both found on Amazon.com
Not Required Supplies (but they add to the fun!):
1 – 3/16 inch Metal Grommets/Eyelets in Light Pink
Grommet or Eyelet Setter and Punch Tool – I use the We R Memory Keepers Crop-A-Dile Eyelet Setter and Snap Punch found at craft stores and Amazon.com
For Cricut Machine Users:
Cricut Machine with Print Then Cut Feature (All machines except the original Joy machine – the Cricut Maker 3 was used in this project.)
Blue Light Grip Mat
Brayer Tool
Weeder Tool
Tweezers
Template #003 is inside the Coffee in My Kitchen Freebie Vault. Enter the Vault HERE or fill out the form below to get the FREE password!

Pink Cozy Reads Bookmark Instructions:
For Cricut Users:
Step One - Create the Bookmark in Design Space
We are going to start this project by uploading the digital pattern paper from the bookmark project file. Open a New Canvas in Design Space and click the Upload button in the left-side panel. On the Upload page, click the Pattern fill option, then Upload Pattern.

Open up the bookmark pack file and select the Pattern Paper JPG file. You can click the Browse option to find the file on your desktop or open up the file separately on your desktop, then Drag and Drop the file into Design Space.
Click Open to add it to Design Space. (If you need assistance downloading and opening the zip file, see our helpful FAQs article HERE!)
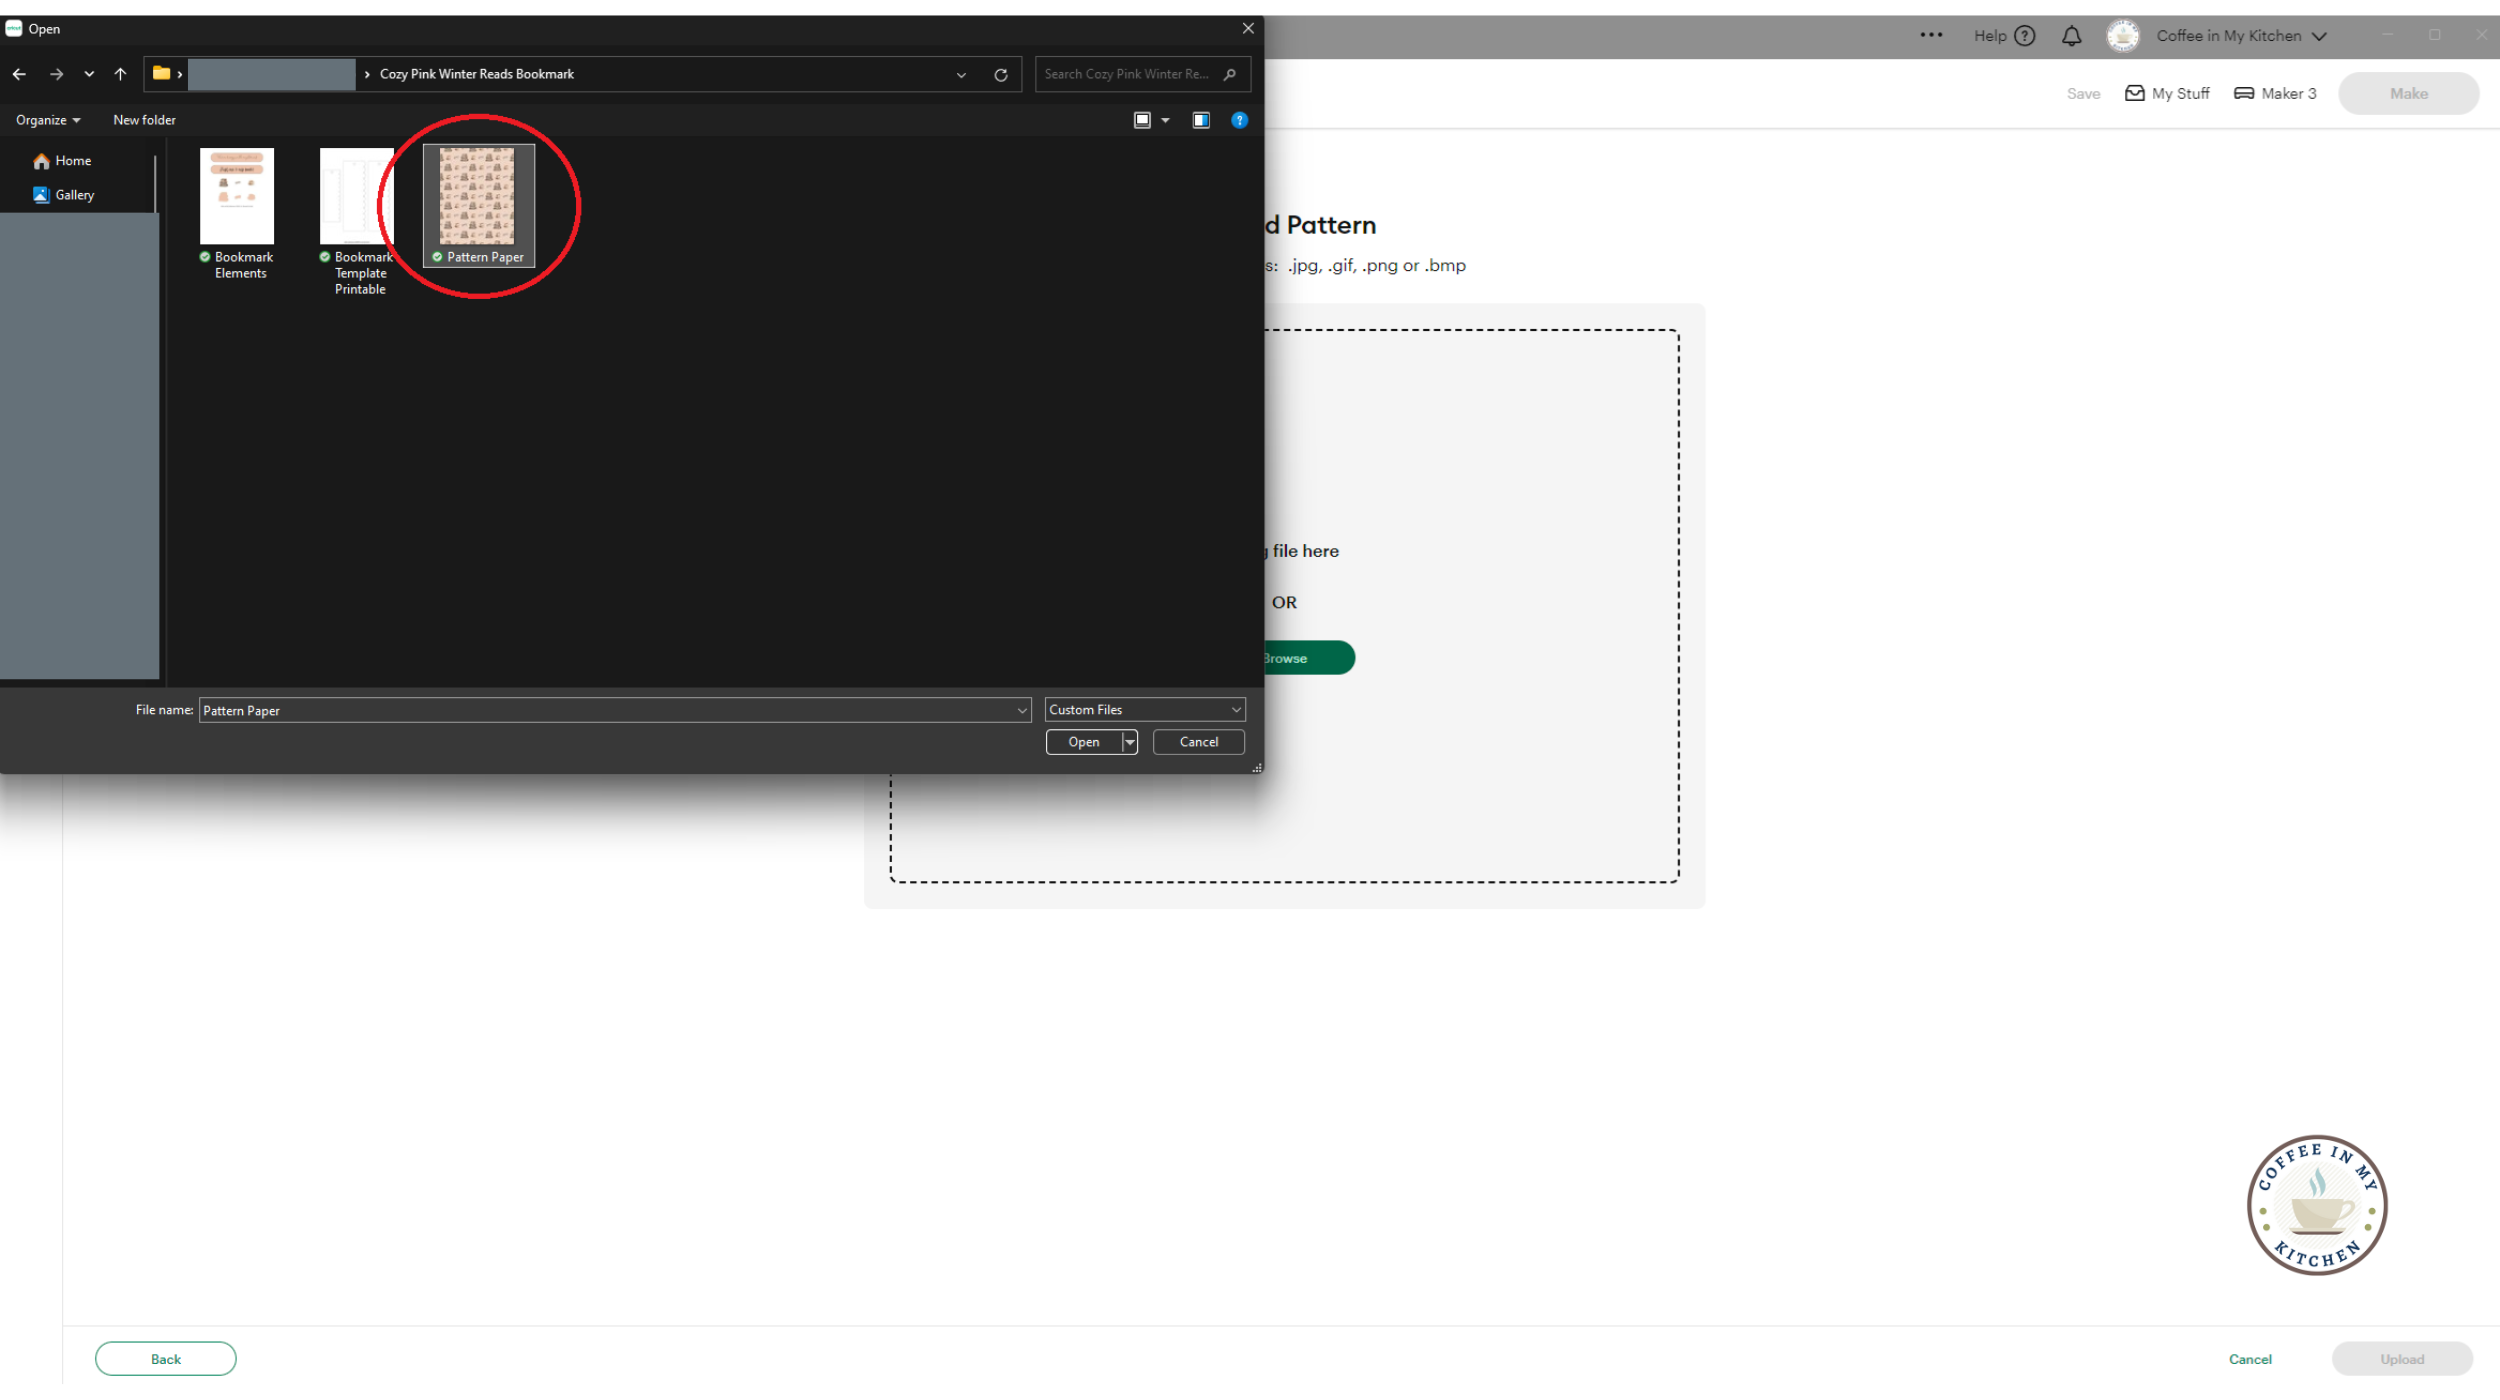
Once the Pattern Paper file has opened in Design Space and this screen appears, click the Upload button in the bottom right-hand corner to add the pattern to the pattern bank.

Design Space will automatically take you back to the blank Canvas. It might take a few minutes, but you’ll see this message “Pattern Upload Successful” once Design Space has finished loading the pattern page.

Now, we’re going to add the bookmark SVG templates to our canvas. Click the Upload button again, and this time, select Image, then Upload Image.

Look for the Medium Bookmark and Small Bookmark SVGs in the bookmark file. One at a time, select the SVG file, click Open or Drag and Drop, and then follow the prompts to Continue and Upload them to the canvas.

Once both SVG bookmarks are open onto the canvas, select the Small Bookmark (the pink one), and go up to the Size menu. Make sure the Lock icon is “locked”, and then set the bookmark size to 2.0 W and 7.0 H.

Next, select the Medium Bookmark (the brown one), and again go to the Size menu. This time, “unlock” the Lock icon and set the bookmark size to 2.5 W and 8.0 H.
NOTE: If the Lock icon is still locked while sizing this bookmark, the size becomes slightly distorted and doesn’t measure correctly for the rest of the project.

Once the bookmark has been resized, click “lock” on the Lock icon so it doesn’t get resized by accident.
Now, select the Medium Bookmark again and duplicate it by right-clicking on your mouse and selecting Duplicate. Next, go to the Flip option in the top menu and select Flip Horizontally from the dropdown. Now, you’ll have two Medium Bookmarks looking at each other on the canvas. How cute!

This is the fun part where we get to turn one of the brown bookmarks into our pattern paper design!
Select the brown bookmark on the right, and go up to the Operation option in the top menu. In the drop down, go all the way down and select Print then Cut.
Next, click on the Print type drop-down and change it from Color to Pattern.
You’ll see the pattern paper you uploaded earlier to the pattern bank. Click on that paper, and you’ll see the brown bookmark change into the pink pattern - pretty cool!
Then, click on Edit Pattern at the bottom of the Print type box.

In the Edit Pattern box, click on the Scale, then type in the number 250. Or you can use the toggle next to the number box to move the numbers up to 250 if you like. See how the pattern gets larger or smaller depending on your selected numbers!
I chose to scale to 250 because I thought the final pattern was a good size for our bookmark project, but feel free to play around with the sizing if you’d like to see it differently!

Now, we’re going to go back to the bookmark project file and select the Bookmark Elements JPG file.

Once you’ve clicked Open or Drag and Drop the file, Design Space will bring you to this Background Remover page.
Under Manual, in the left-hand menu, click on the Select tool. Then, go over and click on any part of the white page. Give Design Space a few moments to load, and wait for the magic to happen!

Ta-da! Design Space has now removed the entire white page, leaving only the elements we want to use for our bookmark!

Before we move on to the canvas, go down to the percentage plus and minus options and increase the elements page to about 325%.
Go to the Manual menu, select Erase, and increase the erase toggle to 100.
Take the mouse cursor and drag it across the Coffee in My Kitchen copyright message to remove it from the elements page. This way, the Cricut machine won’t try to cut around all the tiny letters later in the project.
NOTE: Please remember that this project is for Personal Use Only, and this adjustment doesn’t negate the actual copyright. Thank you!
Once the printing is removed, click Apply and Continue.

On the following two pages (not pictured here), select the Flat Graphic option, Continue, then Upload. It might take a few moments, and the elements file will load to the canvas.
Once the elements appear, go to the Layers panel on the right-hand side and click the red warning icon. We want to decrease the file to fit onto an 8.5x11 inch letter-size paper so it will print correctly. Click the Auto-Resize Image option, and the file will instantly “shrink” to fit the Print then Cut requirements.

The sentiments are still just a little too large for the bookmark itself. Go up to the Size option, ensure the Lock icon is “locked,” then change the width size to 6 W. Now, the sentiments will fit onto the bookmarks once all the pieces are printed and cut!

Yes! Now you have all the pieces for the bookmark project on the canvas! Click Save and give the project a name that you like, or copy mine from below.
Finally, click Make!

Step Two: Prepare the Mats and Materials
In the Mat box, select On Mat for any material and Mat Size at 12 x 12 in. Click Confirm.

On the Prepare screen, check the order in which Design Space will print and cut out each image. Put the white, brown, and pink cardstock in this order now to prevent any mix-ups as you move your cardstock and mats during the cutting phase.
Click Continue when you’re ready to go!

Follow the prompts on the next screen to connect your Cricut machine to your computer.
Load a piece of white cardstock into your printer and click Send to Printer. When the Print Setup box comes up, select your home printer, then make sure that both the Add Bleed option and the Use System Dialog option are toggled ON.
NOTE: The Add Bleed option adds a slight print outline to each element, which causes the Cricut machine to cut a little extra around each piece. Some Print then Cut projects don’t require this little outline, but it’ll work well for our project today. Feel free to play around with this option if you’d like to see how it works with your Print then Cut projects in the future!

When the System Dialog box comes up, click on Preferences. This will open up another print option box where you can select the print quality for this print.

I like to select Best for the Print Quality when printing out a project in color. You can also look for Highest DPI or Highest Quality under the Advanced tab, depending on what kind of printer you have.
For more printer tips for Print then Cut crafts, see the FAQs article HERE!

Once you’ve selected your print quality, follow your printer prompts to print the page!
While the printer works on the elements page, Design Space will pop up an info box telling you how your final printed page should look with the black corner guides (not pictured here).
Once the page is finished printing, compare it to the info box. If it looks good, click Continue to move on to the next step.
If the page doesn’t look right or the black corners aren’t aligned correctly, you can go to Cricut.com and search for their Print then Cut troubleshooting tips. I recently had to follow the steps to realign my Maker 3 machine, which helped with my print projects!
To begin the cutting phase, select Light Cardstock - 65lb (176 gsm). If you don’t have it already bookmarked, select Browse All Materials and scroll down the menu until you get to the Paper category. You’ll see the Light Cardstock option there, and you can click on the bookmark icon to save it to your main menu for future projects.

Now, follow the prompts in Design Space to prepare the Cricut machine for the cutting process.
I keep my Pressure on Default for my Fine-Poin blade, but you can select More in the drop-down menu if you have an older or dull blade. This will help the blade to cut cleanly around the bookmark and other project pieces.

Take the light grip mat and the first piece of white cardstock with the bookmark elements printed. Carefully line up the paper within the mat grid and press down, using the brayer tool to firmly smooth and secure the paper to the mat.

When prompted, load the mat into the machine for alignment and press the blinking Load/Unload button. When the machine is ready, press the Play button. Now, you can sit back and relax while the machine goes through its cutting process!
When the cut is finished, press the Unload button to release the mat from the machine.
Continue following instructions to unload and load each mat, matching the color cardstock paper with each color mat in Design Space. Follow the above printer directions again if needed for the second Print then Cut page.

Step Three - Assemble the Bookmark Template and Cozy Elements
Once the cardstock paper has been cut, carefully remove the excess paper from the design and the mat. I find it easier to bend and gently roll the mat away from the paper instead of pulling the paper away from the flat mat.
Use the weeder tool and the tweezers to help remove the smaller pieces from the mat.


Now comes the fun part! Gather the glue, tape, ribbon, foam tape, and the eyelet and eyelet set tool if you’re using one, and let’s put this bookmark together!
Hand-Cut Crafter Instructions:
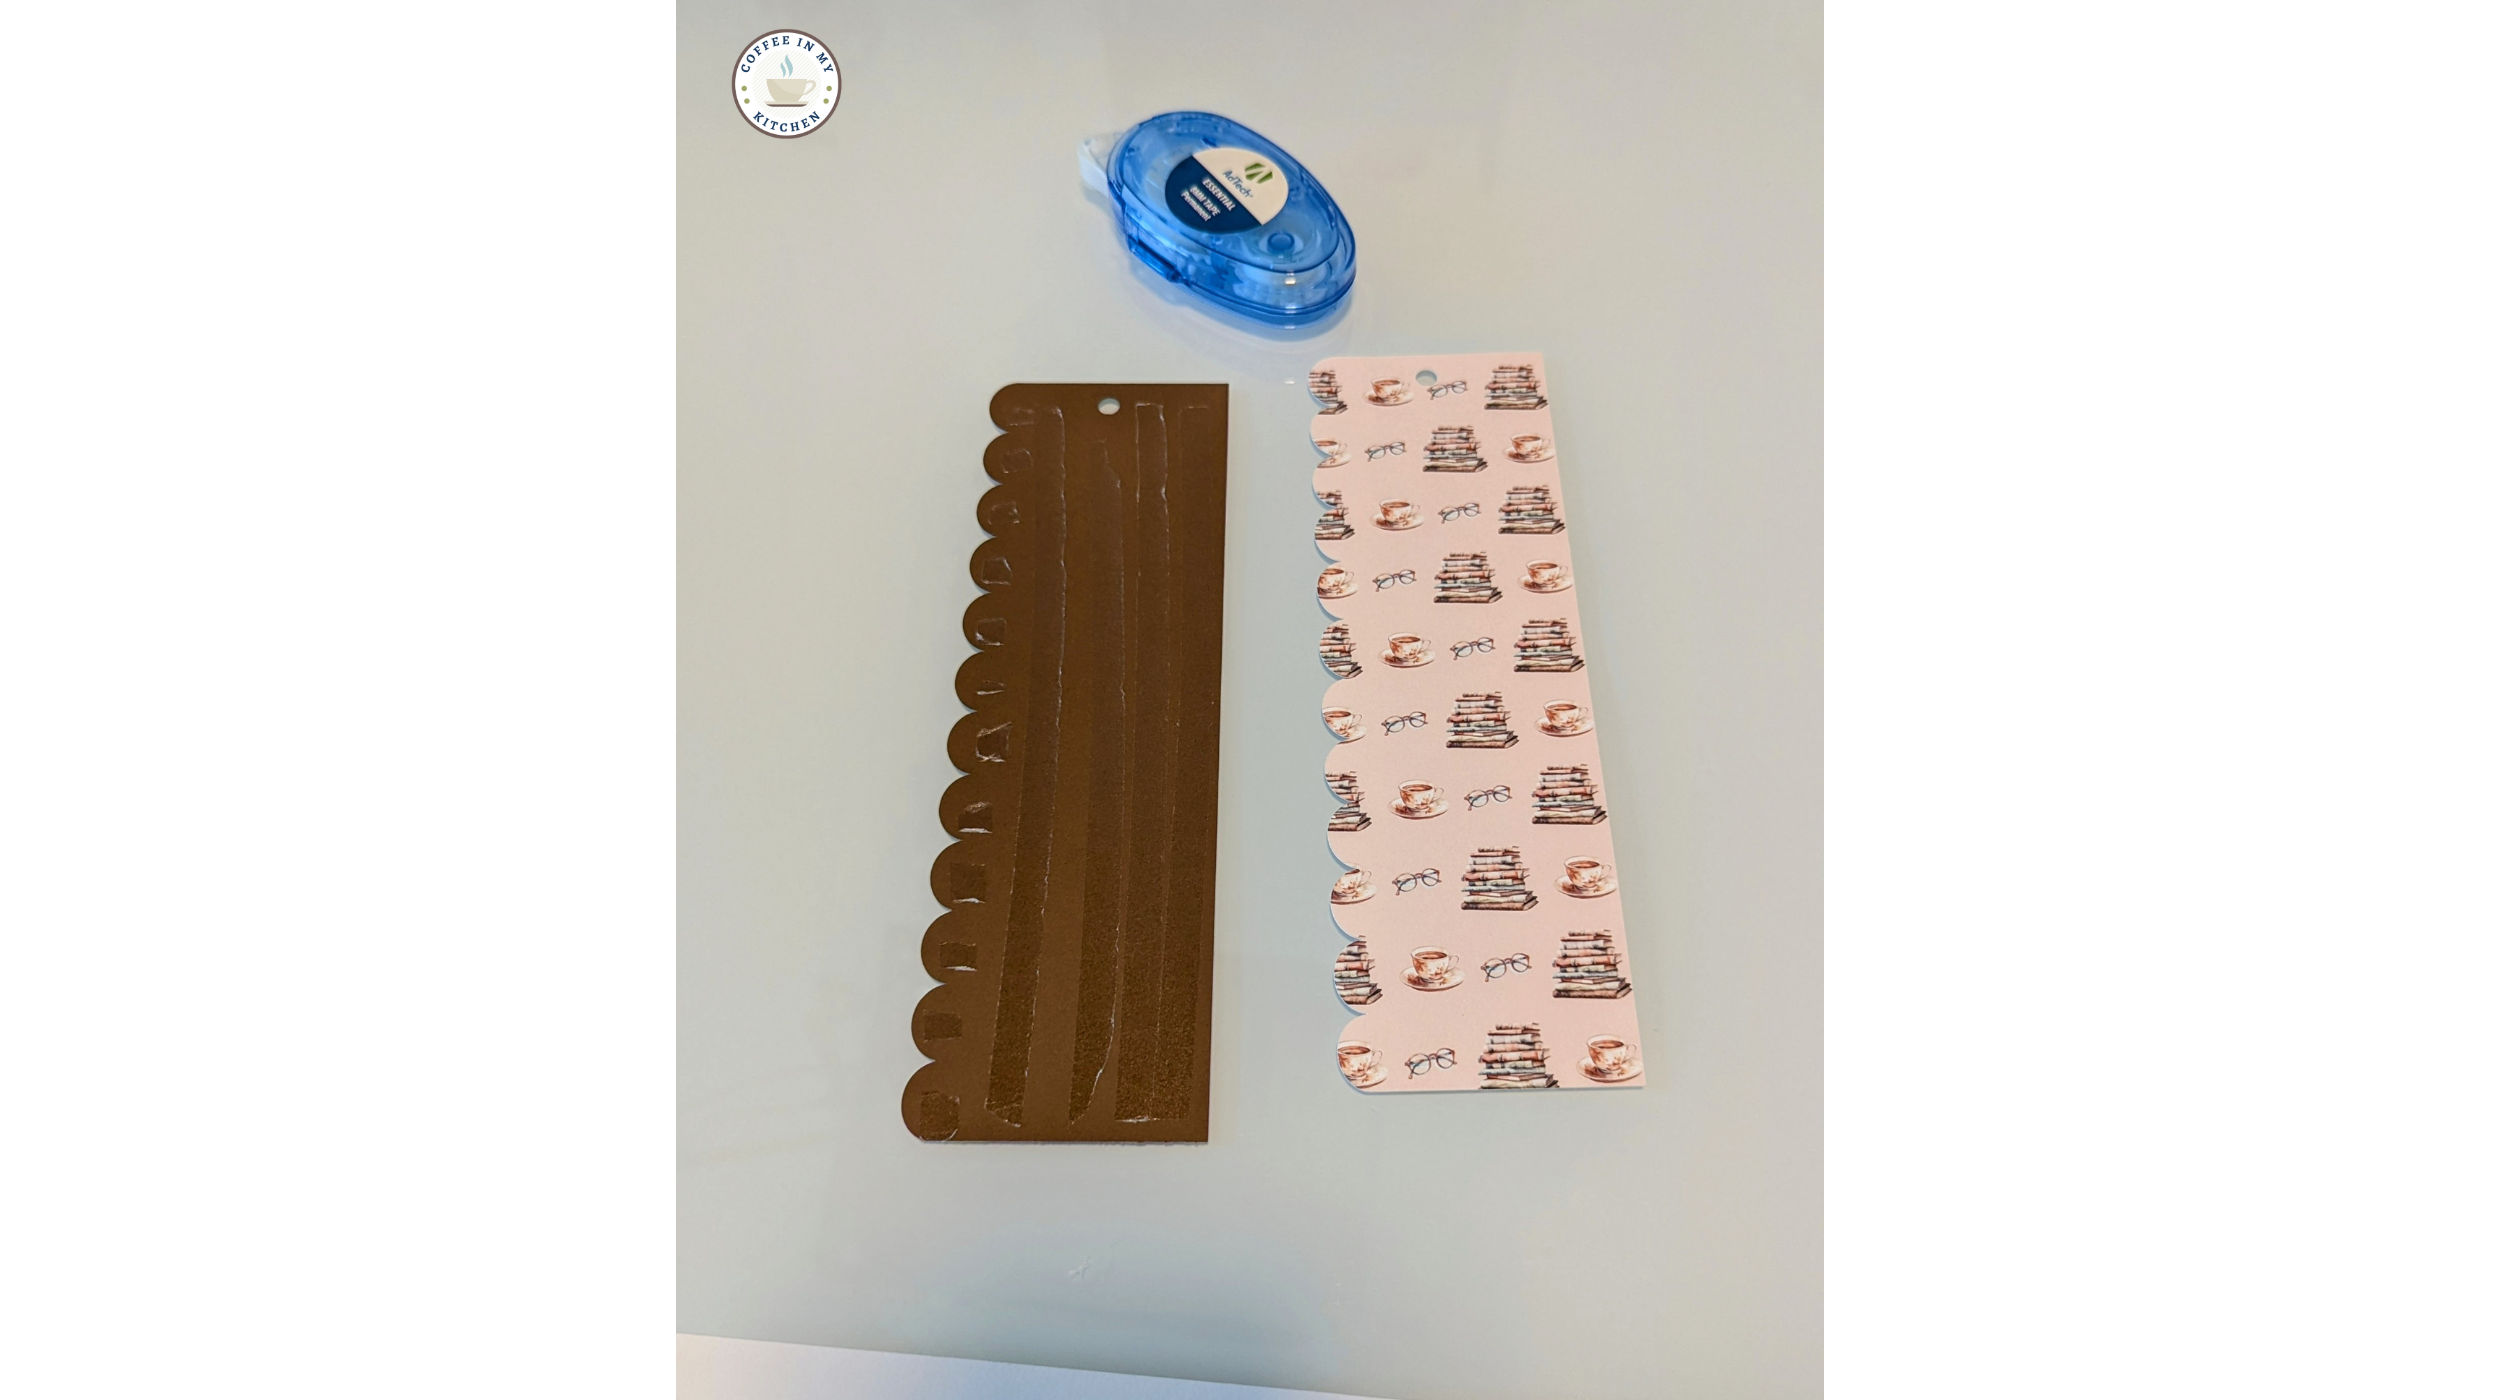
Print out the Bookmark Template, the Pattern Paper, and the Bookmark Elements file on white cardstock paper. If you need assistance getting the JPG files printed or the best print practice info, check out our FAQs article HERE!
Use detail-cut scissors, a paper cutter, and a single-hole punch tool to cut out the bookmark template.
Next, take the Medium bookmark template with the ruffle edge facing left, and using a ruler, line up the template on top of the pattern paper sheet. Carefully sketch an outlet of the template on the pattern paper using a pencil.
Finally, use the detail-cut scissors to cut out the bookmark shape from the pattern paper. Repeat these steps for the brown and light pink cardstock.
When you finish cutting the bookmarks out, move on to the Elements sheet and carefully cut out the sentiments, fussy cut, and die-cut pieces.
Now you’re ready to put the bookmark together! Gather the glue, tape, ribbon, foam tape, and the eyelet and eyelet set tool if you’re using one, and let’s have some fun!


Step Four - Putting the Bookmark Together!
Take the brown bookmark cardstock and the pattern bookmark cardstock. Flip the brown cardstock over and add double-sided tape or glue to the back of the piece. Carefully line up the pattern cardstock over the top of the brown one and press the two pieces together. Use scissors to trim away any excess cardstock that sticks out if needed.


Take the pink bookmark cardstock, flip it over, and add tape or glue to the back. Carefully line up the two punch holes at the top of the cardstock pieces. Press down to adhere both pieces together.


Choose a sentiment from the Elements page and save the other to make a second bookmark if you like!
Take the foam tape and cut a strip a little shorter than the length of the sentiment. Adhere the tape strip to the back of the sentiment, then line up the sentiment on top of the bookmark and press down firmly to attach it.
Next, gather the fussy-cut and die-cut pieces together. Cut three small pieces of foam tape and attach them one at a time to the front of the die-cut pieces. Line the fussy-cut pieces up with the center of their coordinating die-cut pieces. Press each fussy-cut piece firmly on top of its coordinating die-cut piece.
The die cuts are a little larger than the fussy cuts and will show a bit of a border around the back of the designs. So cute!


One at a time, add small amounts of glue to the back of each fussy-cut piece and carefully place it onto the bookmark. Press down firmly for a few minutes to let the glue set.
I found that using a pair of tweezers helped me hold the small fussy cut pieces while I added glue to them, and then also helped me to align the pieces onto the bookmark exactly where I wanted them!


This next step is optional but super fun!
If you have an eyelet/grommet setter tool and eyelets, feel free to add a pink eyelet to the top of the bookmark. The metal eyelet protects the punch hole in the cardstock from accidentally ripping, and it’s also a very pretty decoration for the bookmark!
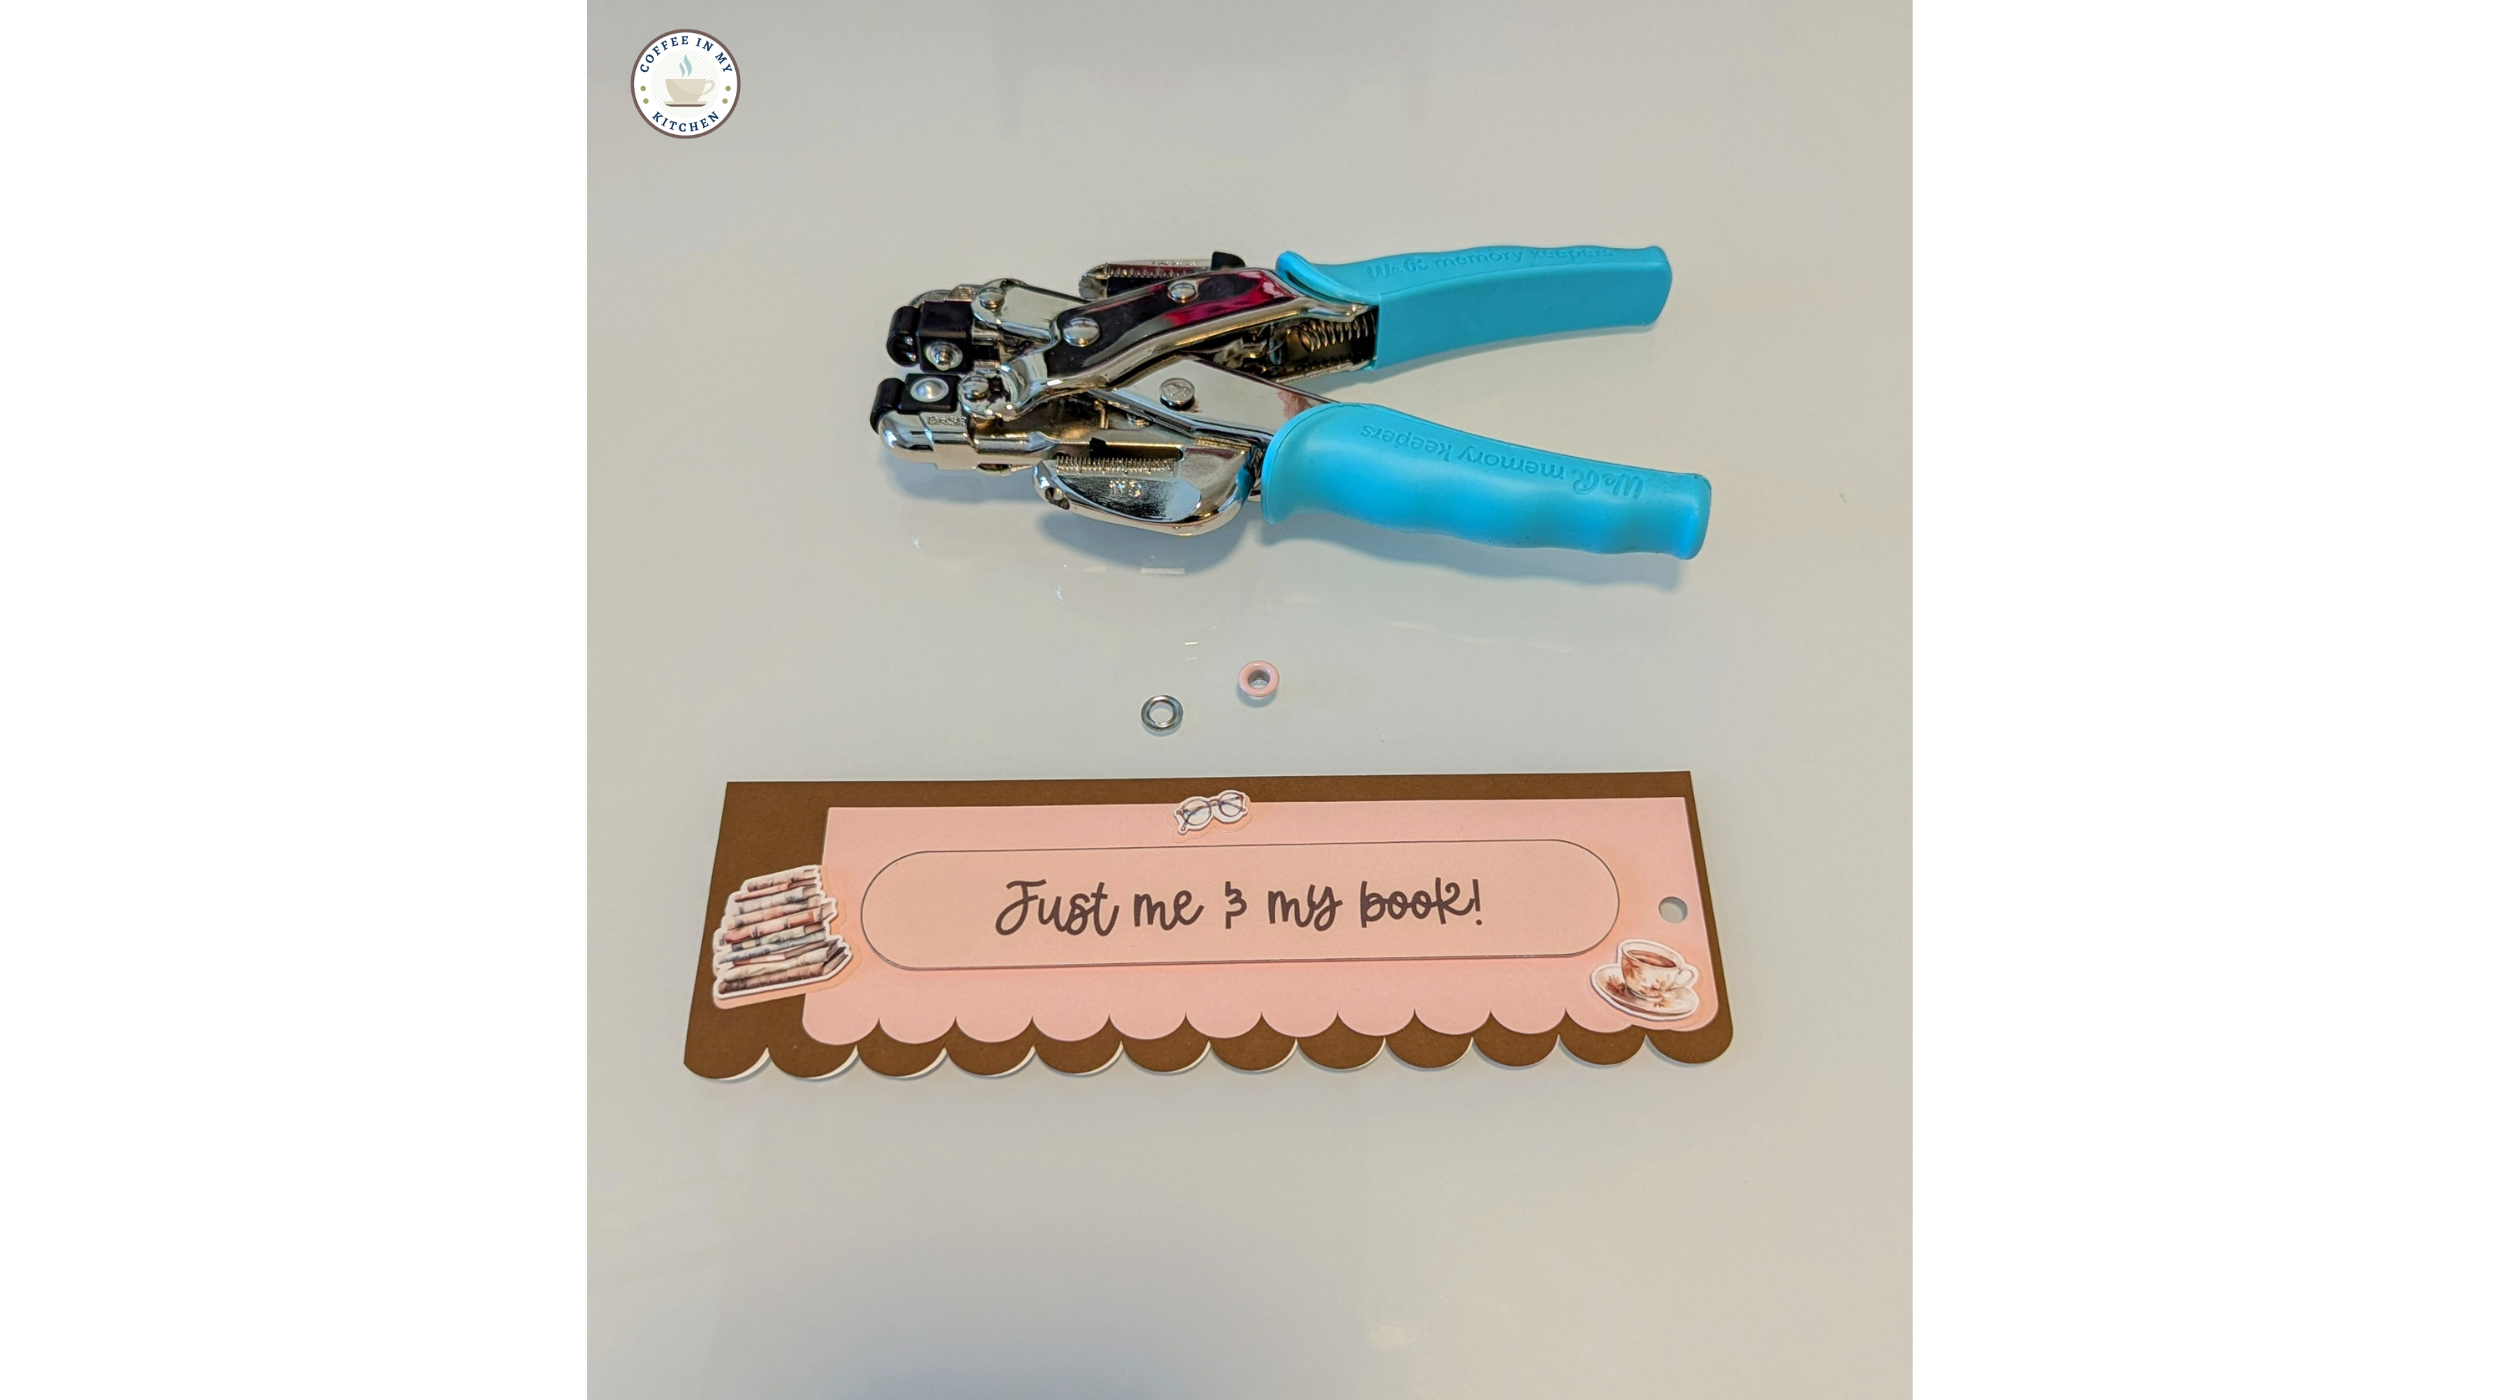

Finally, take the strand of ribbon cut into approximately 8 1/2 inches, thread it through the punch hole at the top of the bookmark, and tie it in a square or slip knot.
I used a slip knot and added a tiny dot of glue in between the knot strands to secure the ribbon pieces together.


And that’s it! Congratulations, you just completed making this super cute Cozy Pink Winter Reads Bookmark! Enjoy this bookmark while relaxing with a good book and a cup of tea or cocoa this winter!

Conclusion:
Making the Cozy Pink Winter Reads Bookmark project is the perfect way to bring warmth and charm to your reading adventures this winter! Whether using a Cricut cutting machine for precision cuts or crafting by hand for a more personal touch, this project invites you to enjoy the beauty of handmade art while expressing your love for books.
With its soft pink and brown palette and delicate watercolor details, such as stacks of books, a steaming cup of tea, and vintage-inspired reading glasses, this bookmark is more than a crafting project—it’s a little piece of winter joy right in your cozy place!
So grab your favorite book, curl up in a special nook, and let your Cozy Pink Winter Reads Bookmark be a sweet reminder to savor this cold yet cuddly season!