
DIY Spring Gift Tags and Cards – Free Flutter and Bloom Template

Make This Flutter and Bloom Tag Collection!
Spring is in the air, and it’s the perfect time to add a fresh, floral touch to your crafting projects! Whether you’re creating handmade cards, decorating gifts, or journaling your seasonal memories, this free Flutter & Bloom Spring Tag Collection has everything you need. Featuring butterflies, wildflowers, and warm golden hues, this set includes SVG and JPG templates for easy cutting, printing, and crafting.
Best of all, this versatile set works for cutting machines or hand-cut crafting, so whether you're a digital cutting pro or love traditional paper crafting, you’re covered! Keep reading to download your free Flutter & Bloom templates and get inspired with creative ways to use them!

Why You’ll Love This Project:
Versatile & Customizable – Use these tags as gift tags, journal cards, bookmarks, or card embellishments. The mix of SVG and JPG templates makes it easy to craft your way!
Spring-Inspired Beauty – Featuring butterflies, wildflowers, and golden honey hues, these designs bring a soft, seasonal charm to any project.
Perfect for Any Crafting Style – Whether you use a cutting machine or prefer hand-cut designs, these templates work seamlessly for all types of crafters.
This Flutter & Bloom Spring Tag Collection is perfect for adding a fresh, handmade touch to your seasonal crafts!
We’ll be using the free Flutter & Bloom Spring Tag Collection freebie from the Freebie Vault, and I’ll also show you some more elegant designs for the tag collection using the Flutter & Bloom: Spring Tag Expansion Pack from the Coffee in My Kitchen Shop.
With step-by-step instructions and detailed photos, we’ll guide both Cricut cutting machine users and hand-cut crafters, ensuring everyone can join in the fun!
Are you ready? Let’s start crafting!


Make two more beautiful and elegant tag collections in Dusty Rose and Powder Blue available in our Shop!
Table of Contents:
Supplies List:
3 - 4 sheets 8.5x11 in. White Cardstock Paper – I like Neenah Vellum Bristol 67lb/147gsm Cardstock paper from Amazon or the Astrobrights Bright White 65lb/176gsm Cardstock paper from Walmart
1 sheet – 12x12in Golden Yellow Cardstock Paper 65lb/176gsm – you can also use a 8.5x11in cardstock sheet, just make sure to change the paper size in Design Space before cutting.
Fine Detail Cutting Scissors
Double-Sided Foam Dots
Powder Blue Ribbon 1/8th inch Wide and at least 2 ft Long (enough for two projects - see project pictures in Part Three - Assembly Instructions below)
An Embroidery Needle or Other Large-Type Sewing Needle
Single Hole Punch Tool if Hand-Cut Crafting
For Cricut Machine Users:
Cricut Machine with Print Then Cut Feature (All machines except the original Joy machine – the Cricut Maker 3 was used in this project.)
Blue Light Grip Mat
Brayer Tool
Weeder Tool
Scraper Tool
Template #005 is inside the Coffee in My Kitchen Freebie Vault. Enter the Vault HERE or fill out the form below to get the FREE password!
Optional Upgrade:
Want more creative options? The Spring Tag Expansion Pack includes two more tag color sets in Dusty Rose & Powder Blue, spring greeting sentiments, and butterfly floral ephemera for even more fun! Get your pack at the Coffee in My Kitchen Shop HERE!

Spring Tag Collection Instructions
Part One: Instructions for Cricut Crafters
Step One - Create the Tag Collection in Design Space
Resizing the Tags
We’re going to start this project by uploading the Golden Honey Arch Tag SVG file from the Flutter & Bloom Spring Tags Freebie Pack folder.
Open Cricut Design Space and click New Project to open up a new Canvas. Click the Upload button on the left panel.

Click Upload Image and then Browse.

Locate the Flutter & Bloom Spring Tags Freebie Pack folder on your computer and double-click to Open. Select the Golden Honey Arch Tag SVG and click Open. (If you need assistance downloading and opening the zip file, see our helpful FAQs article HERE!)

The file will appear in the Upload Preview—click Continue, then click Upload.


Your SVG design will now be on the Design Space canvas!

Repeat the above steps to upload the Golden Honey Arch Panel and the Golden Honey Arch 4x6 SVG files to the canvas.
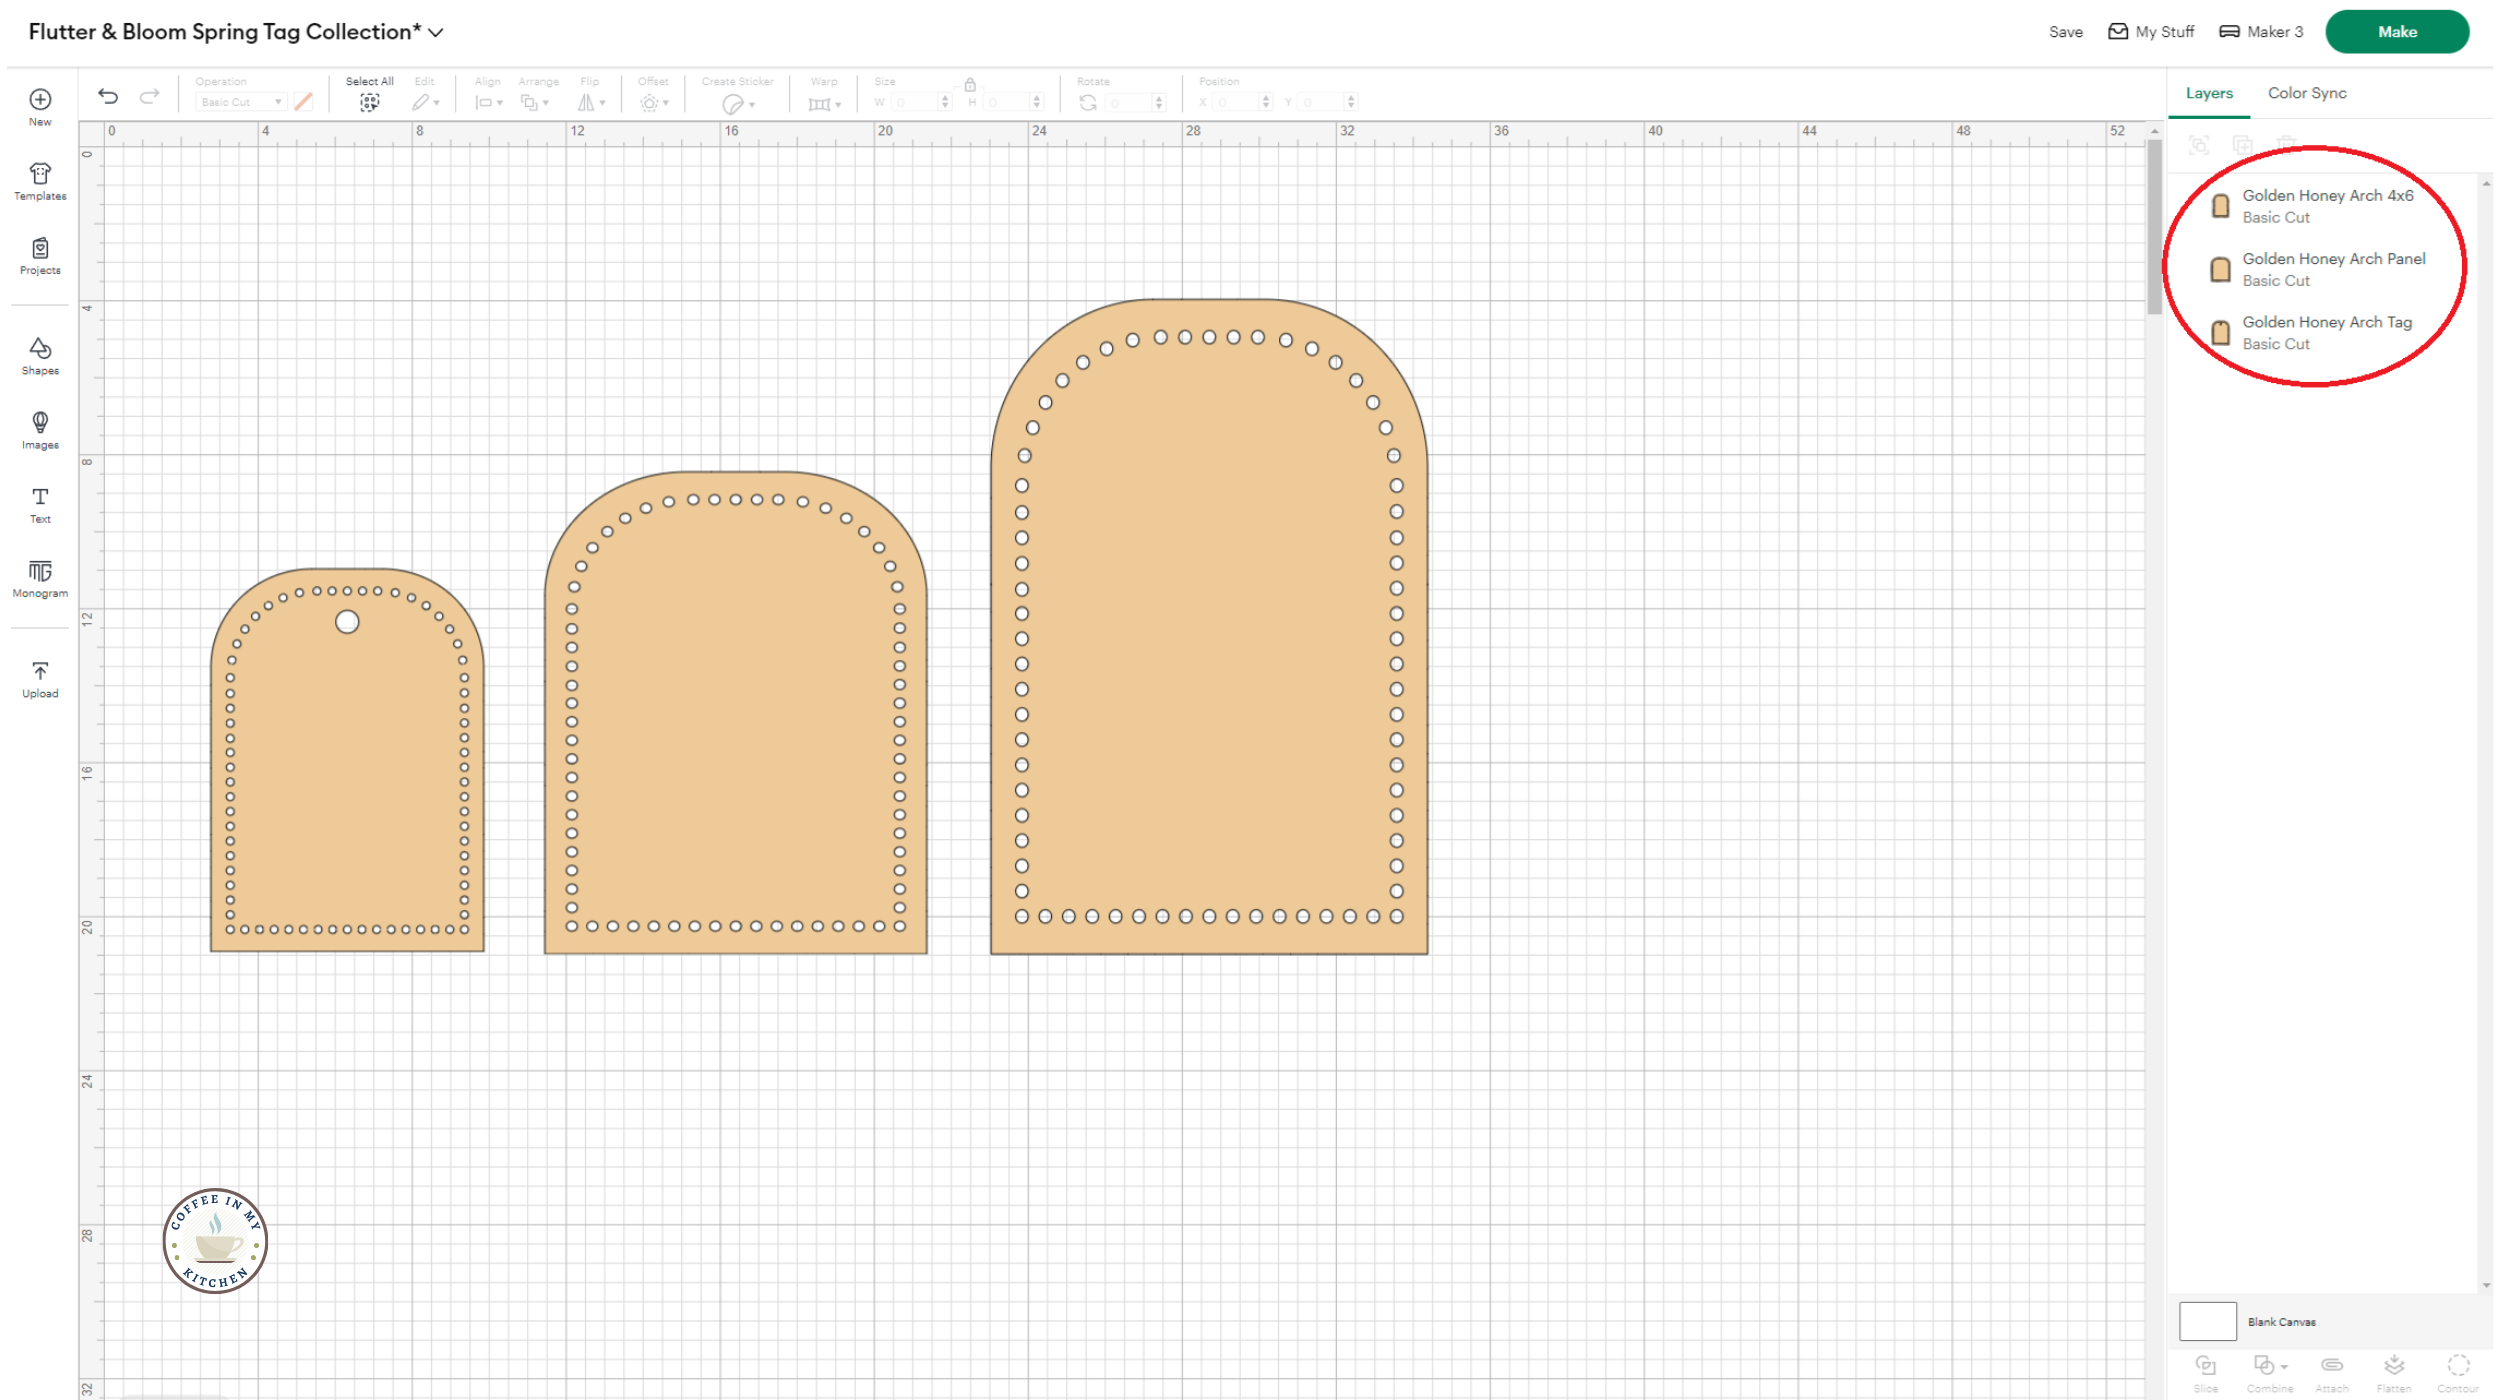
Now, we’re going to resize all the images.
Go up to the Top Menu Panel. For both the tag and the card panel images, leave the Lock Icon “locked”.
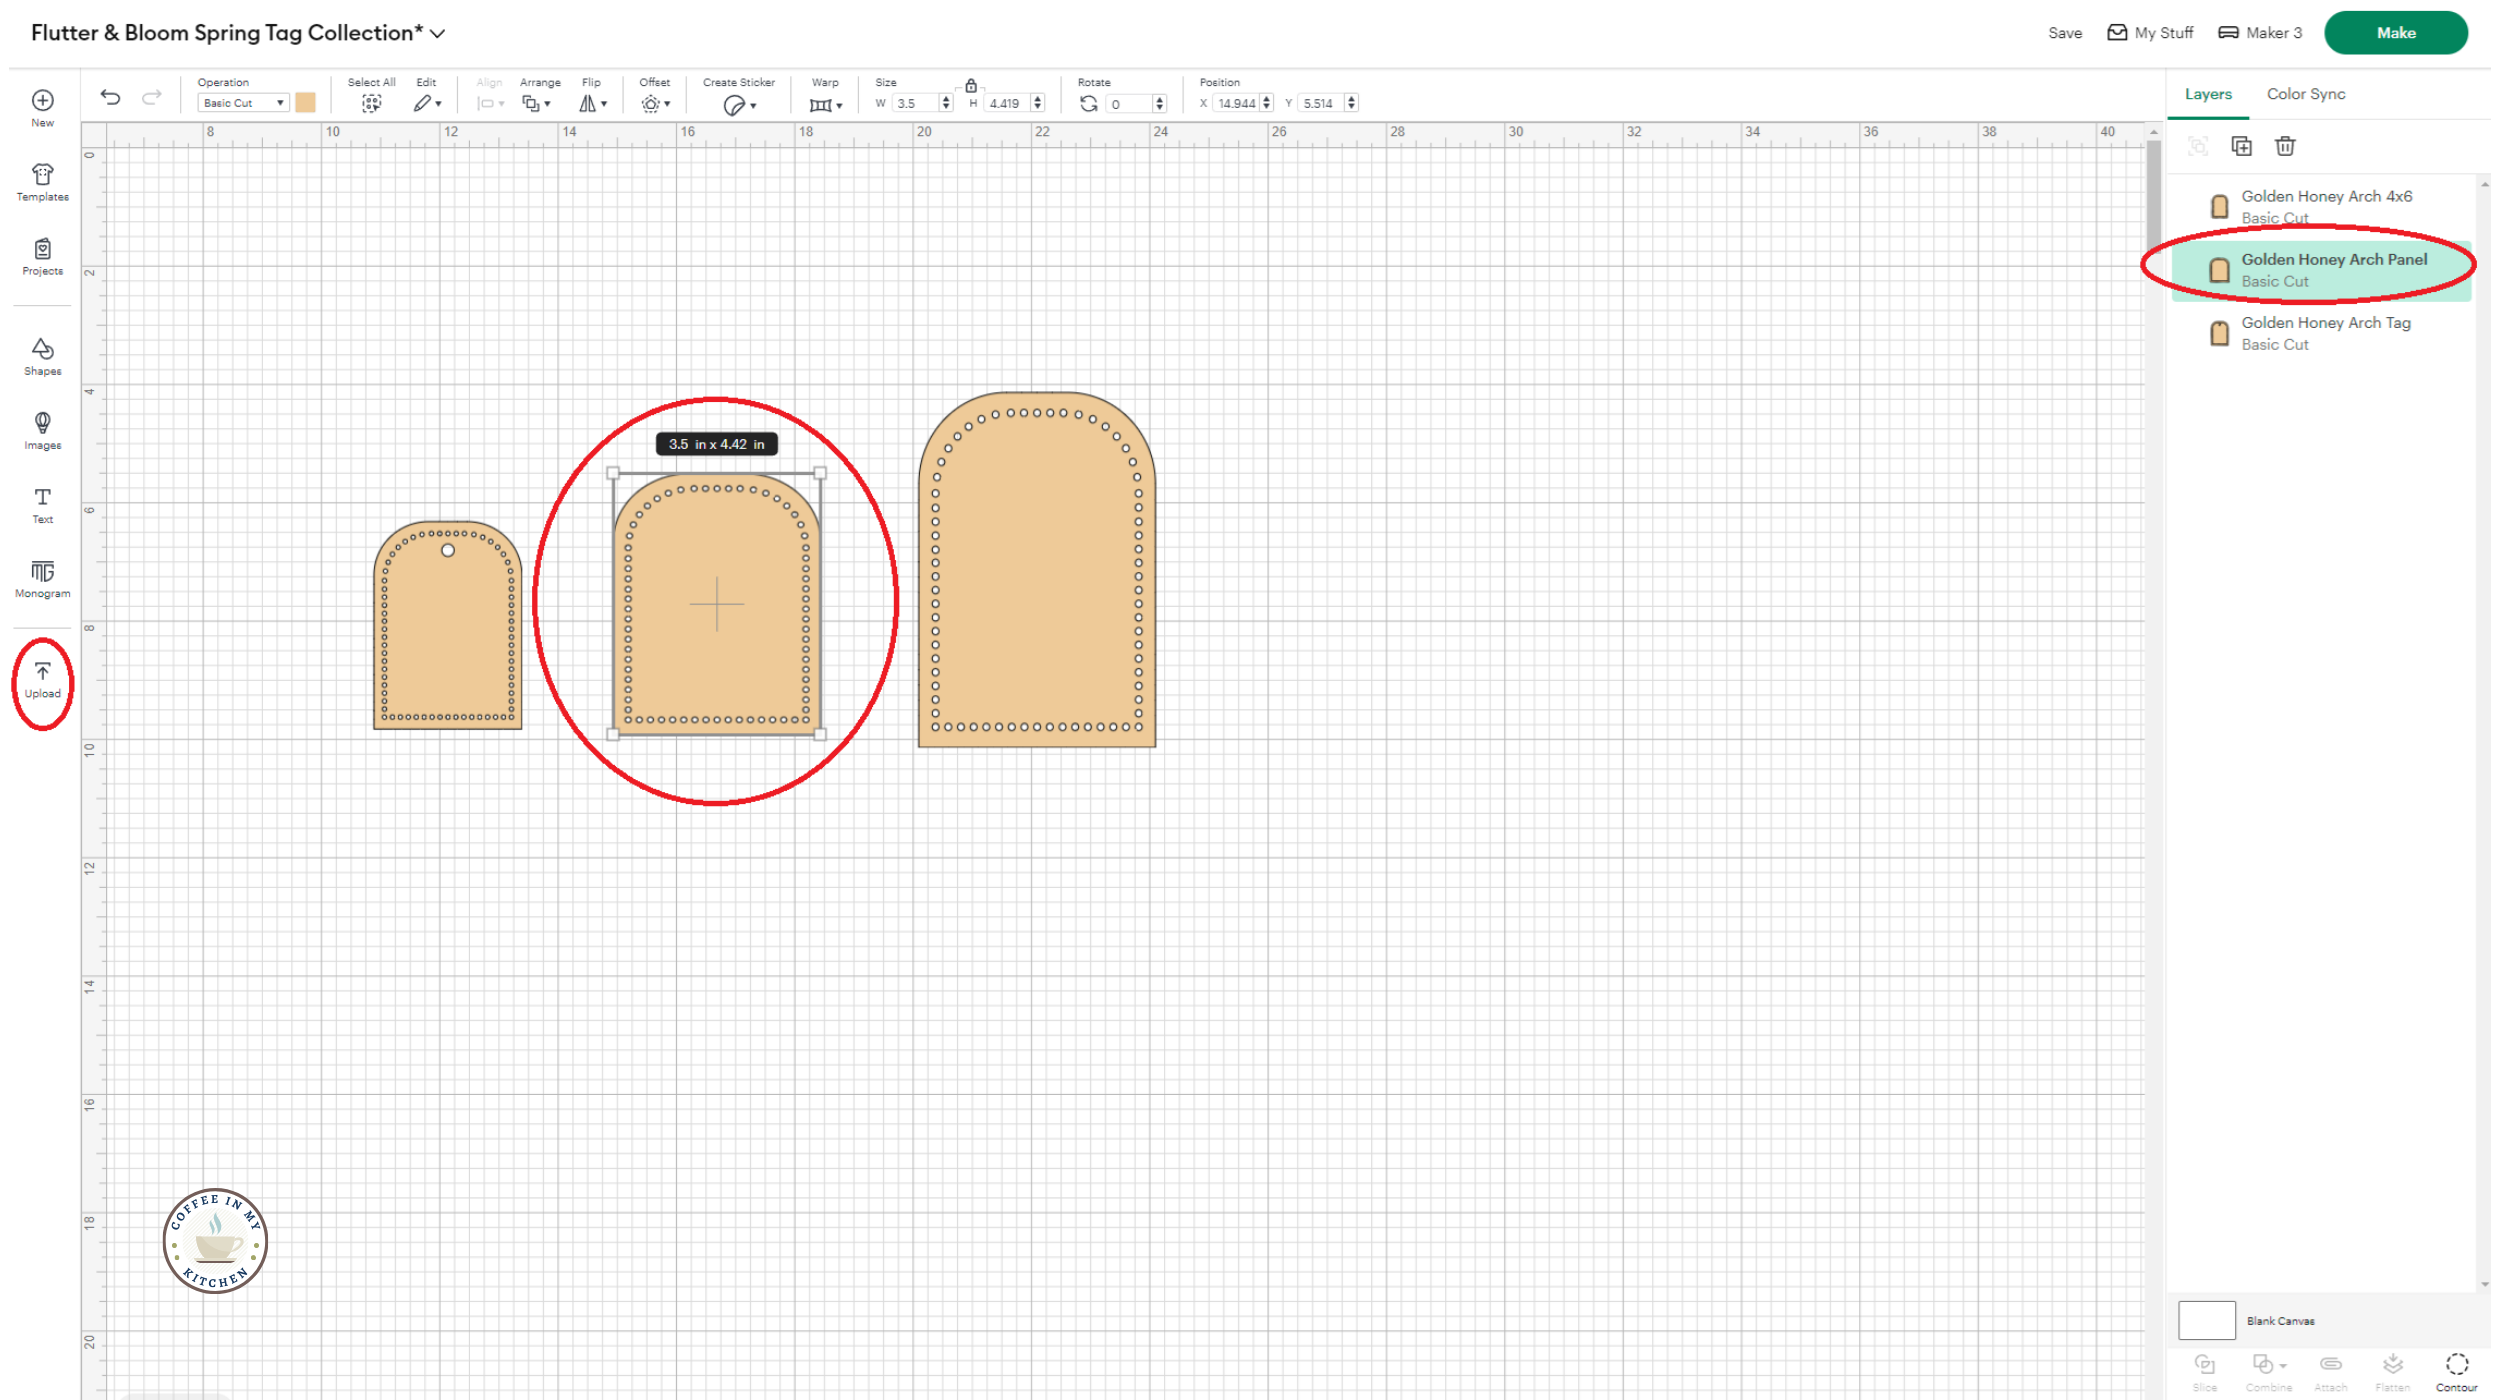
Click on the tag and resize it to 2.5in W.

Click on the card panel and resize it to 3.5in W.

For the 4x6 image, click the Lock icon to “unlock.” Then, click on the 4x6 image and resize it to 4in W and 6in H.

Adding Digital Paper Background
Now, let’s add a digital paper background to the card panel image. Click on the Upload icon on the left panel.
On the next Upload page, click the Pattern fill option (not Image), then Upload Pattern button.

Select the Golden Honey Gingham 1 JPG file from the Spring Tags Freebie Pack folder and click Open.

Once the Golden Honey Gingham 1 JPG file has opened in Design Space and this screen below appears, click the Upload button in the bottom right-hand corner to add the pattern to the pattern bank.
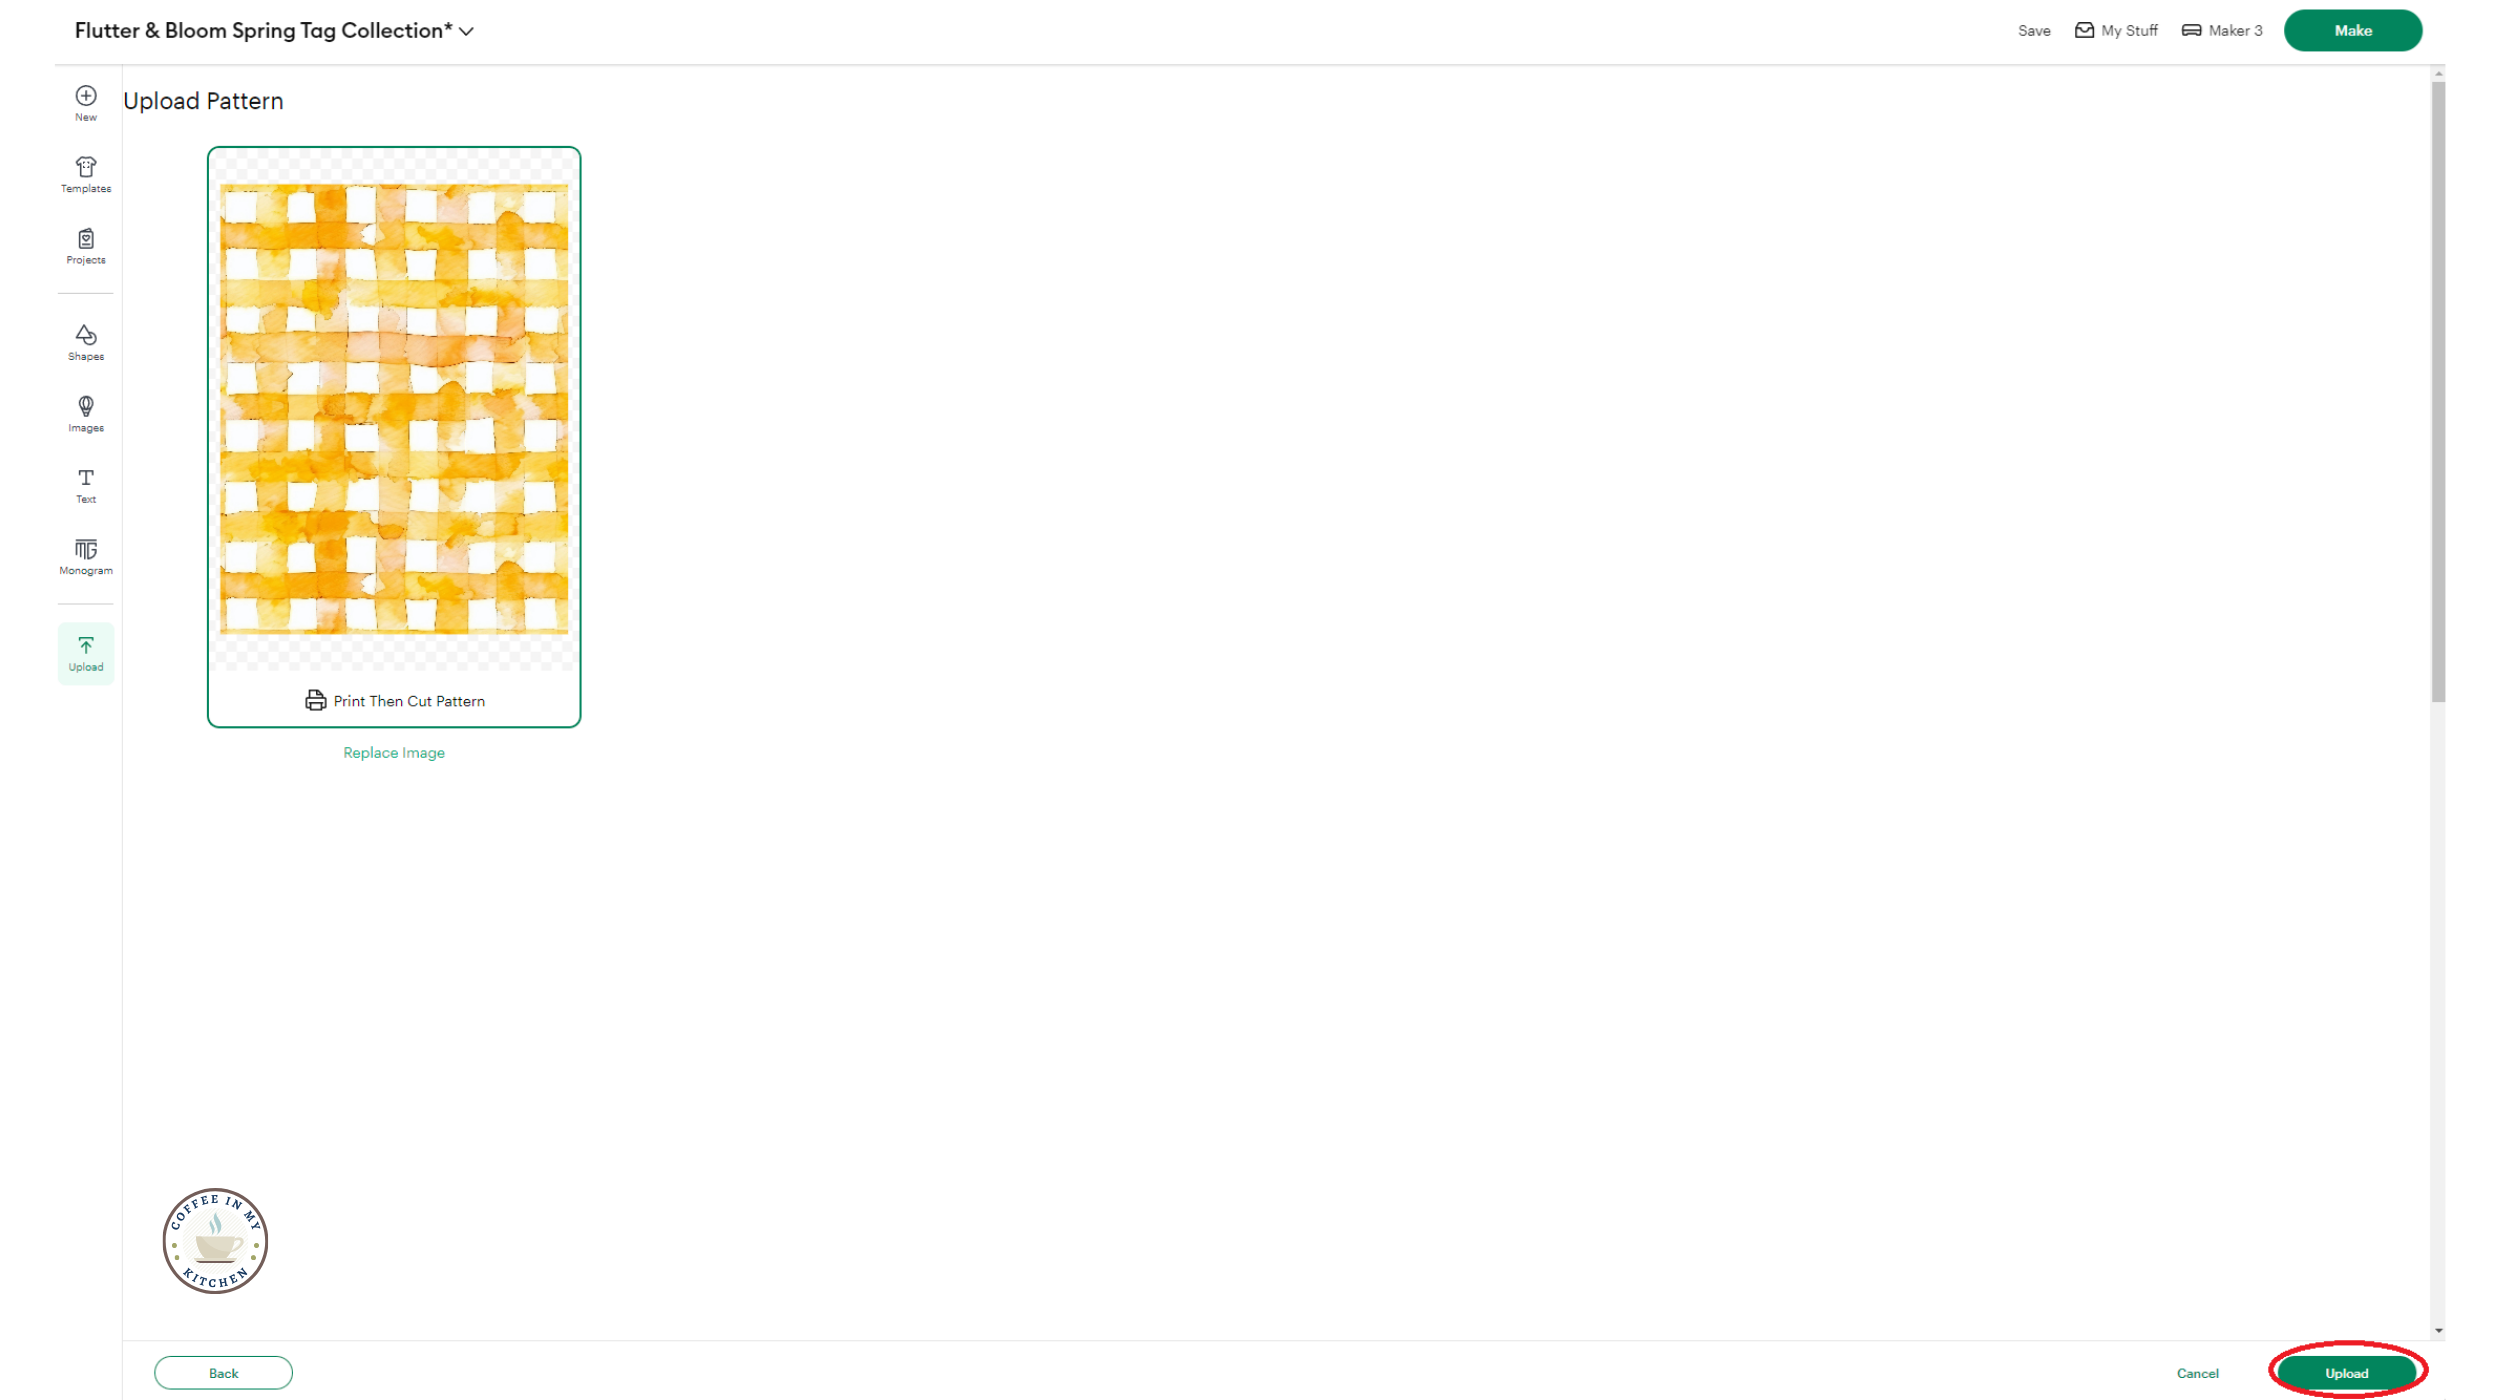
Design Space will automatically return you to the Upload Page. It might take a few minutes, but once Design Space has finished loading the JPG file, you'll see this message: “Pattern Upload Successful.” Click Cancel at the bottom of the page to return to the canvas.

This is the fun part: turn the card panel into our gingham pattern paper design!
Click on the card panel and select the Operation option in the top menu. In the drop-down, scroll down and select Print, then Cut.
Next, click on the Print Type drop-down and change it from Color to Pattern.
You’ll see the Golden Honey Gingham pattern paper you uploaded to the pattern bank earlier. Click on that paper, and the card panel will change into the yellow pattern - pretty cool!
Then, click on Edit Pattern at the bottom of the Print type box.

In the Edit Pattern box, click on the Scale, then type in the number 90. Or you can use the toggle next to the number box to move the numbers up to 90 if you like. See how the pattern gets larger or smaller depending on your selected numbers!
NOTE: Because this is NOT a seamless pattern paper design (it’s an 8.5 x 11 paper size vs. a 12 x 12 paper size), edges could be shown in the pattern box. Making the size of the pattern paper around 90+ spreads out the pattern enough to keep the edges outside of our project dimensions. Feel free to play around with the pattern sizing and see what you come up with, especially if you use this pattern paper in the larger 4x6 designs!
When you’re satisfied with the pattern size, click the X to exit the Edit Pattern box.

Now, the card panel has been updated from a Basic Cut to a beautiful Print-Then-Cut pattern, creating instant patterned paper for the card panel design!

Preparing the Ephemera and Sentiments Sheet
Now, we’re going to go back once more to the Spring Tag Freebie Pack folder and select the Ephemera and Sentiments JPG file.

Once you’ve clicked Open or Drag and Drop the file, Design Space will bring you to the Upload page. Click Continue.
Now, the Background Remover page will appear.
Under Manual, in the left-hand menu, click on the Select tool. Then, go over and click on any part of the white page. Give Design Space a few moments to load, and wait for the magic to happen!

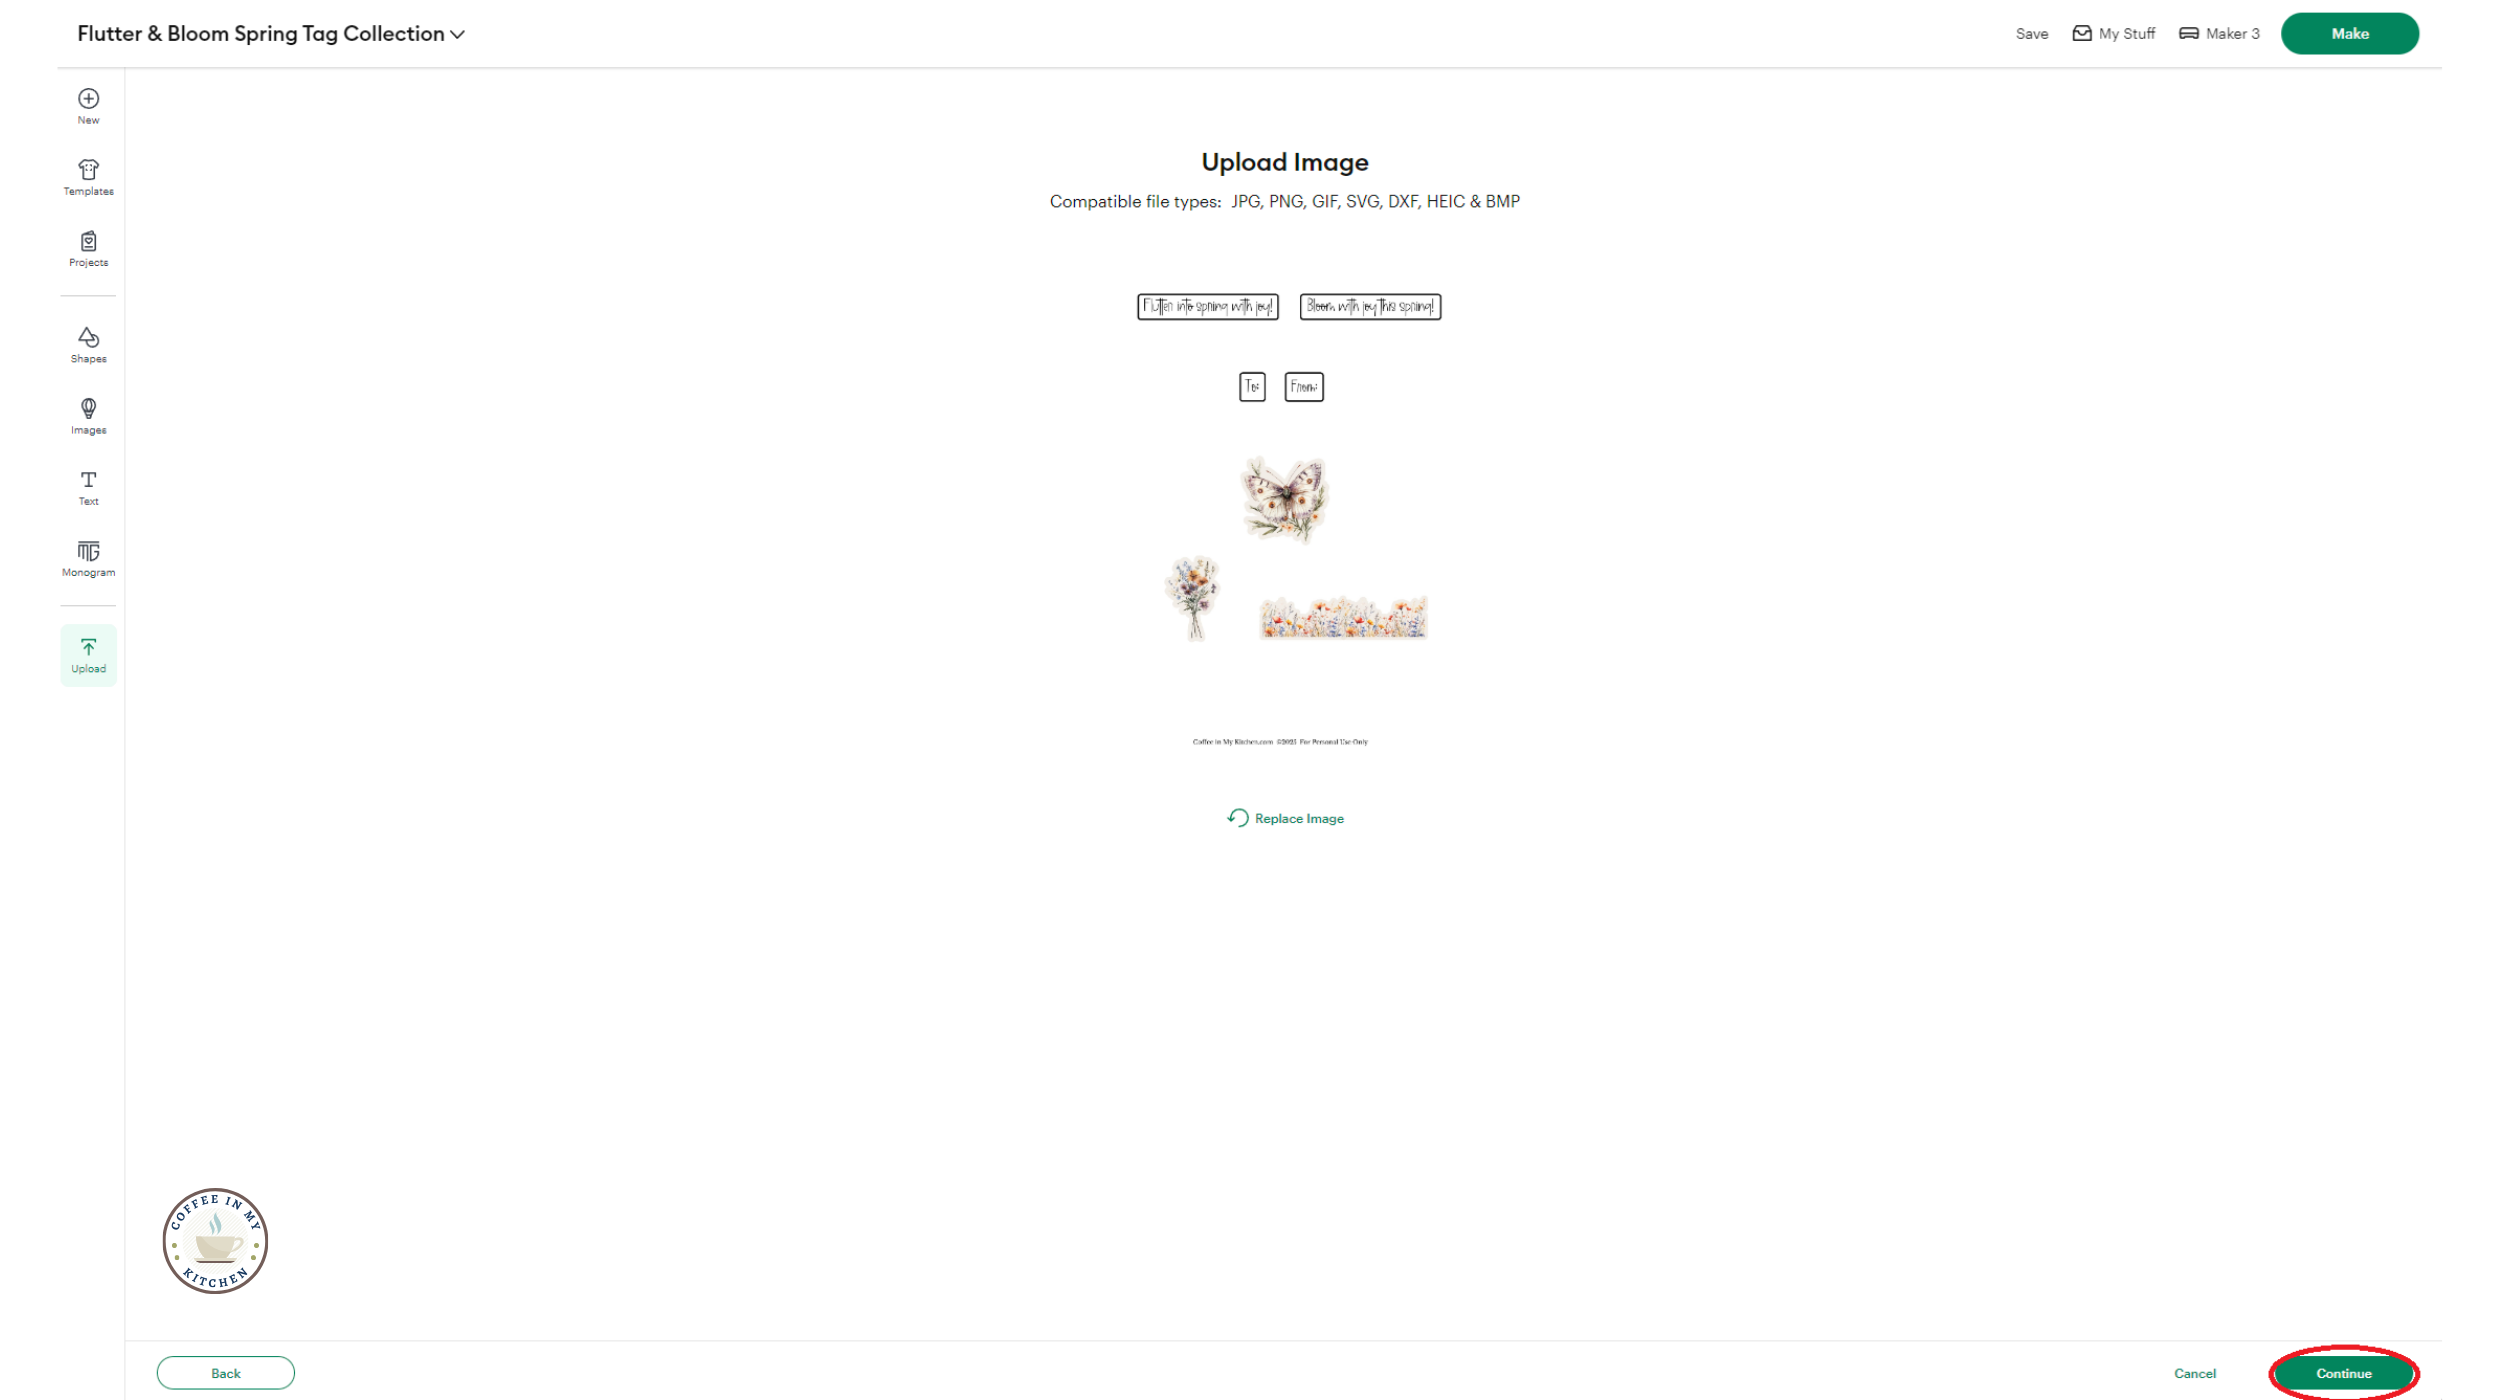
Ta-da! Design Space has now removed the entire white page, leaving only the ephemera and sentiments we want to use for our tag collection!

Before we move on to the canvas, go down to the percentage plus and minus options and increase the elements page to about 325%.
Go to the Manual menu, select Erase, and increase the erase toggle to 100.
Take the mouse cursor and drag it across the Coffee in My Kitchen copyright message to remove it from the elements page. This way, the Cricut machine won’t try to cut around all the tiny letters later in the project.
NOTE: Please remember that this project is for Personal Use Only, and this adjustment doesn’t negate the actual copyright. Thank you!

Once the printing is removed, click Apply and Continue.

On the following two pages, select the Flat Graphic option, Continue, and then Upload. It might take a few moments, and the elements file will load to the canvas.


Once the ephemera and sentiments image appears, go to the Layers panel on the right-hand side and click the red warning icon. We want to decrease the file to fit onto an 8.5x11 inch letter-size paper so it will print correctly. Click the Auto-Resize Image option, and the file will instantly “shrink” to fit the Print then Cut requirements.


Now, we have all the images ready to print and cut!
Click Save and give the project a name that you like, or copy mine from below.

And now, the moment we’ve been waiting for! Click Make!

Step Two: Prepare the Mats and Materials
In the Mat box, select On Mat for any material and Mat Size at 12 x 12 in. Click Confirm.

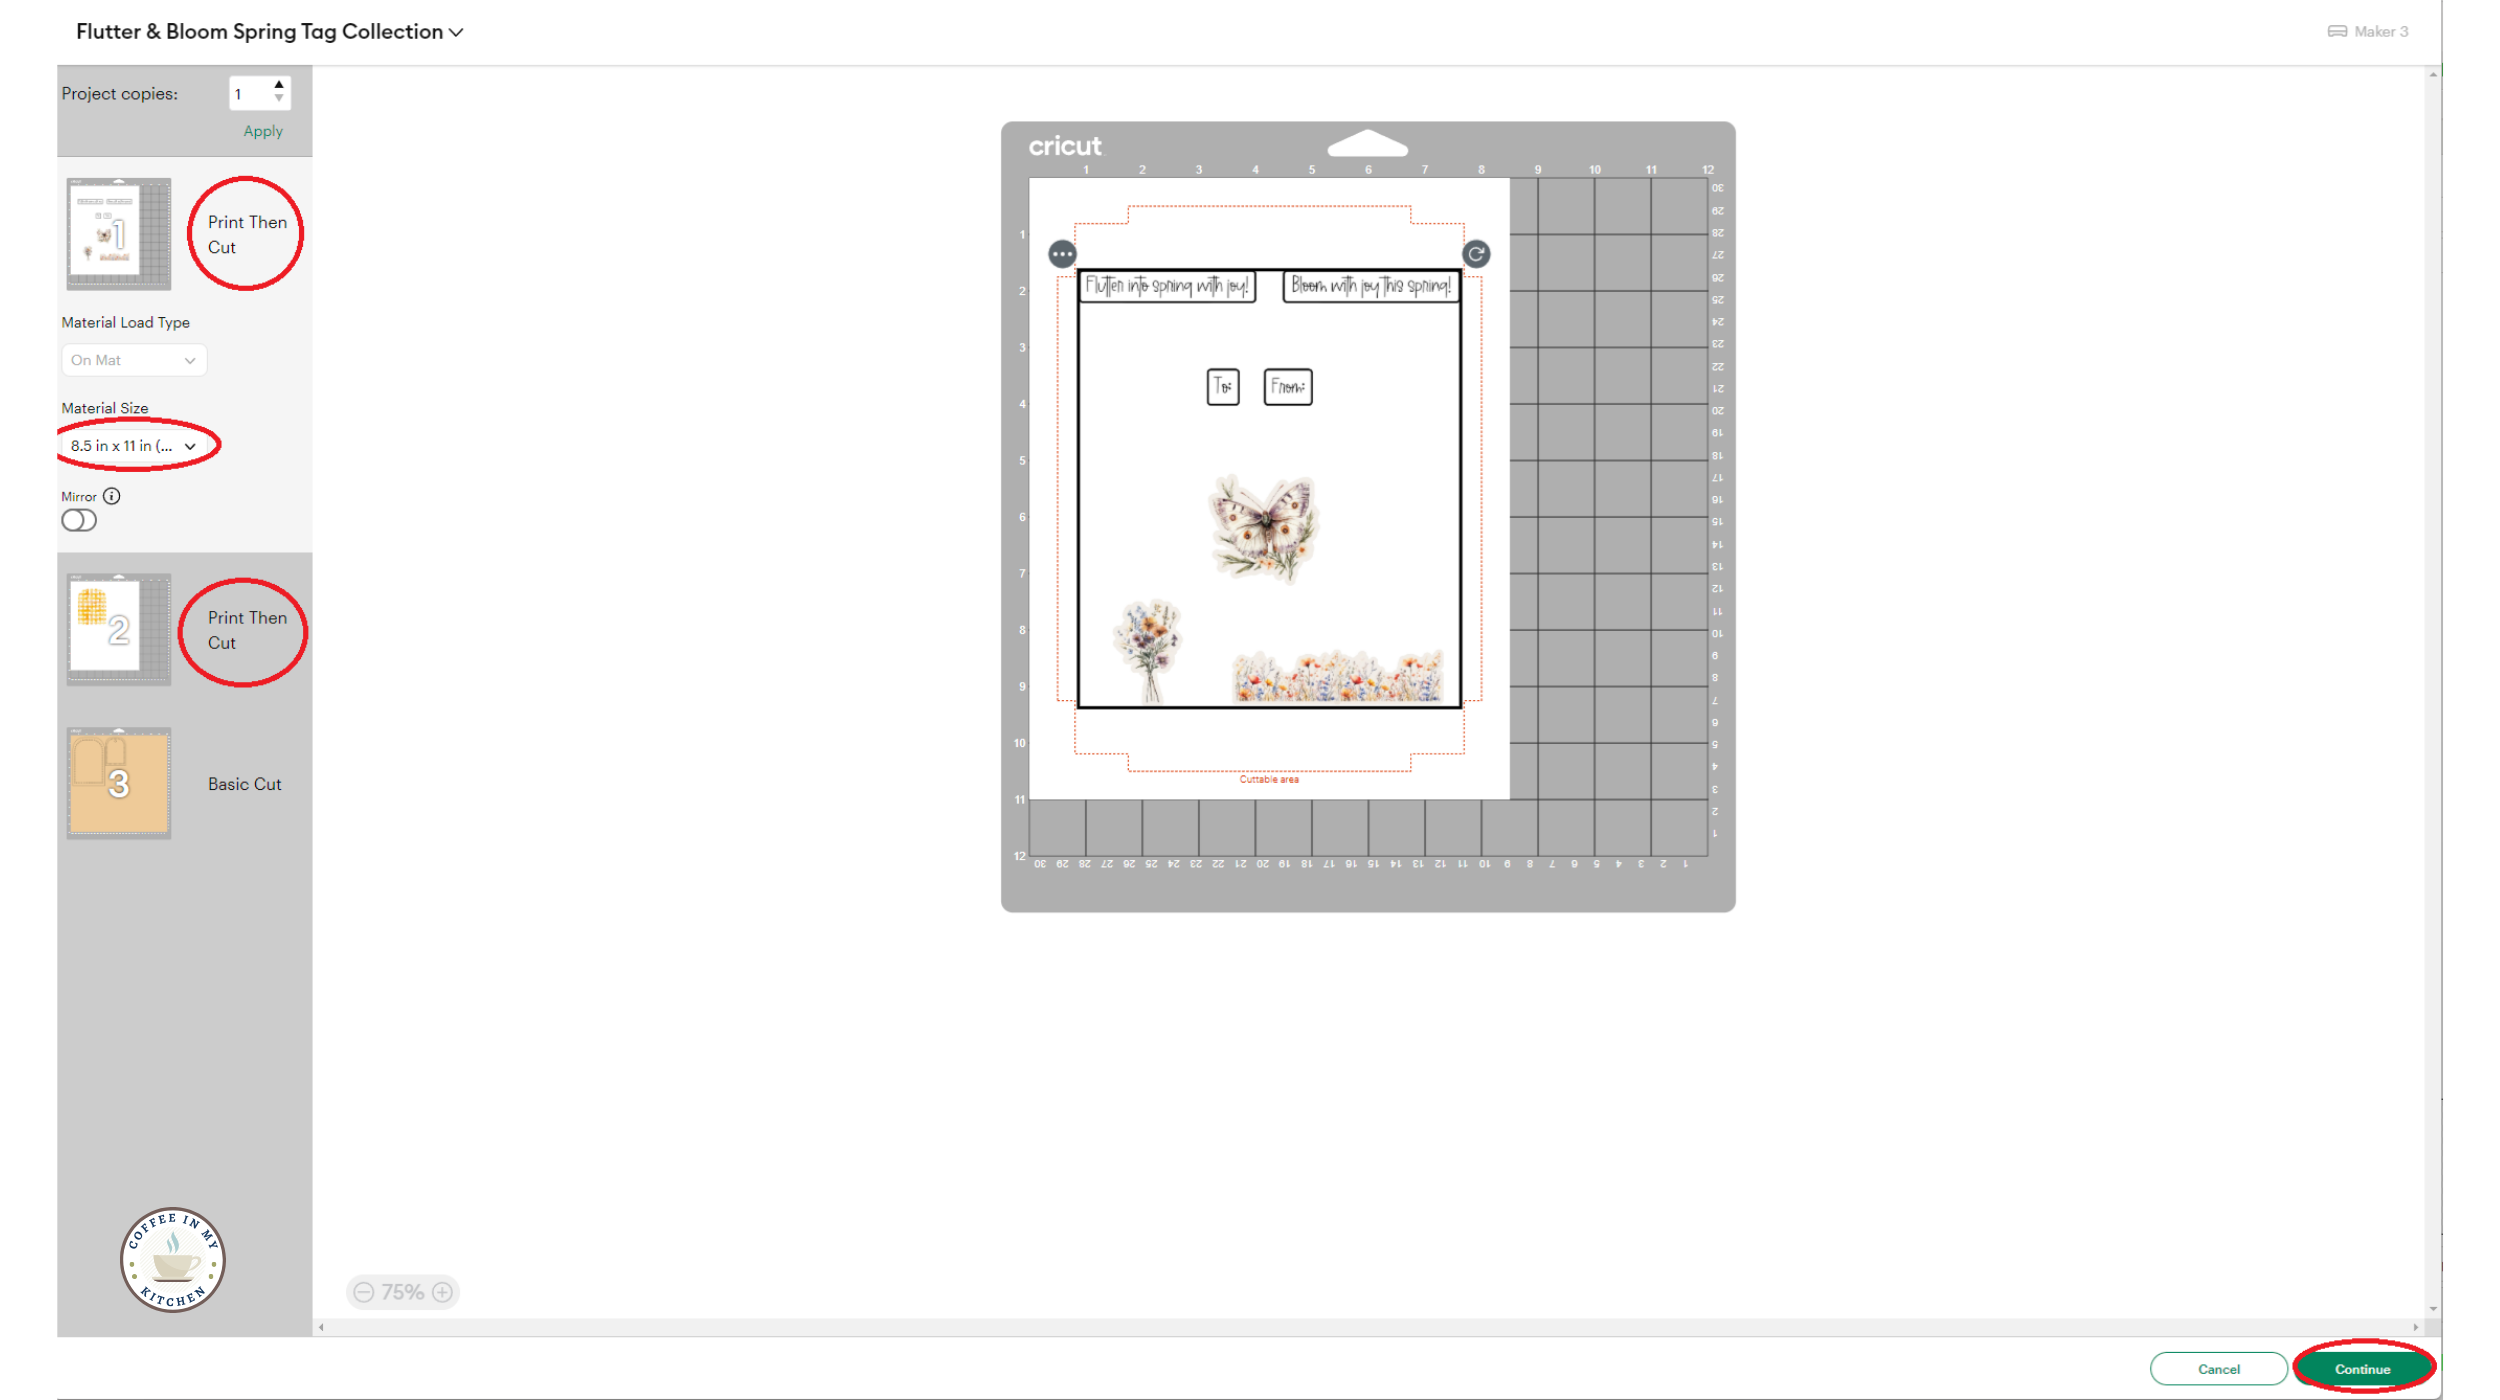
On the Prepare screen, check the order in which Design Space will print and cut out each image. Put the white and yellow cardstock in this order now to prevent any mix-ups as you move your cardstock and mats during the cutting phase. Note that the Print Then Cut papers will go through first.
NOTE: If you’re using an 8.5 x 11in yellow cardstock instead of a 12x12in, click on the Basic Cut box where you see the yellow paper mat. The Material Size drop-down will appear, and you can scroll up until you see the 8.5x11in letter size option. Click on the option, and Design Space will automatically change the paper on the mat and reshuffle the tag images to fit the 8.5x11 size sheet.
Click Continue when you’re ready to go!
Follow the prompts on the next screen to connect your Cricut machine to your computer.

Load a piece of white cardstock into your printer and click Send to Printer. Review the Sensor Marks Added note, and click Next.

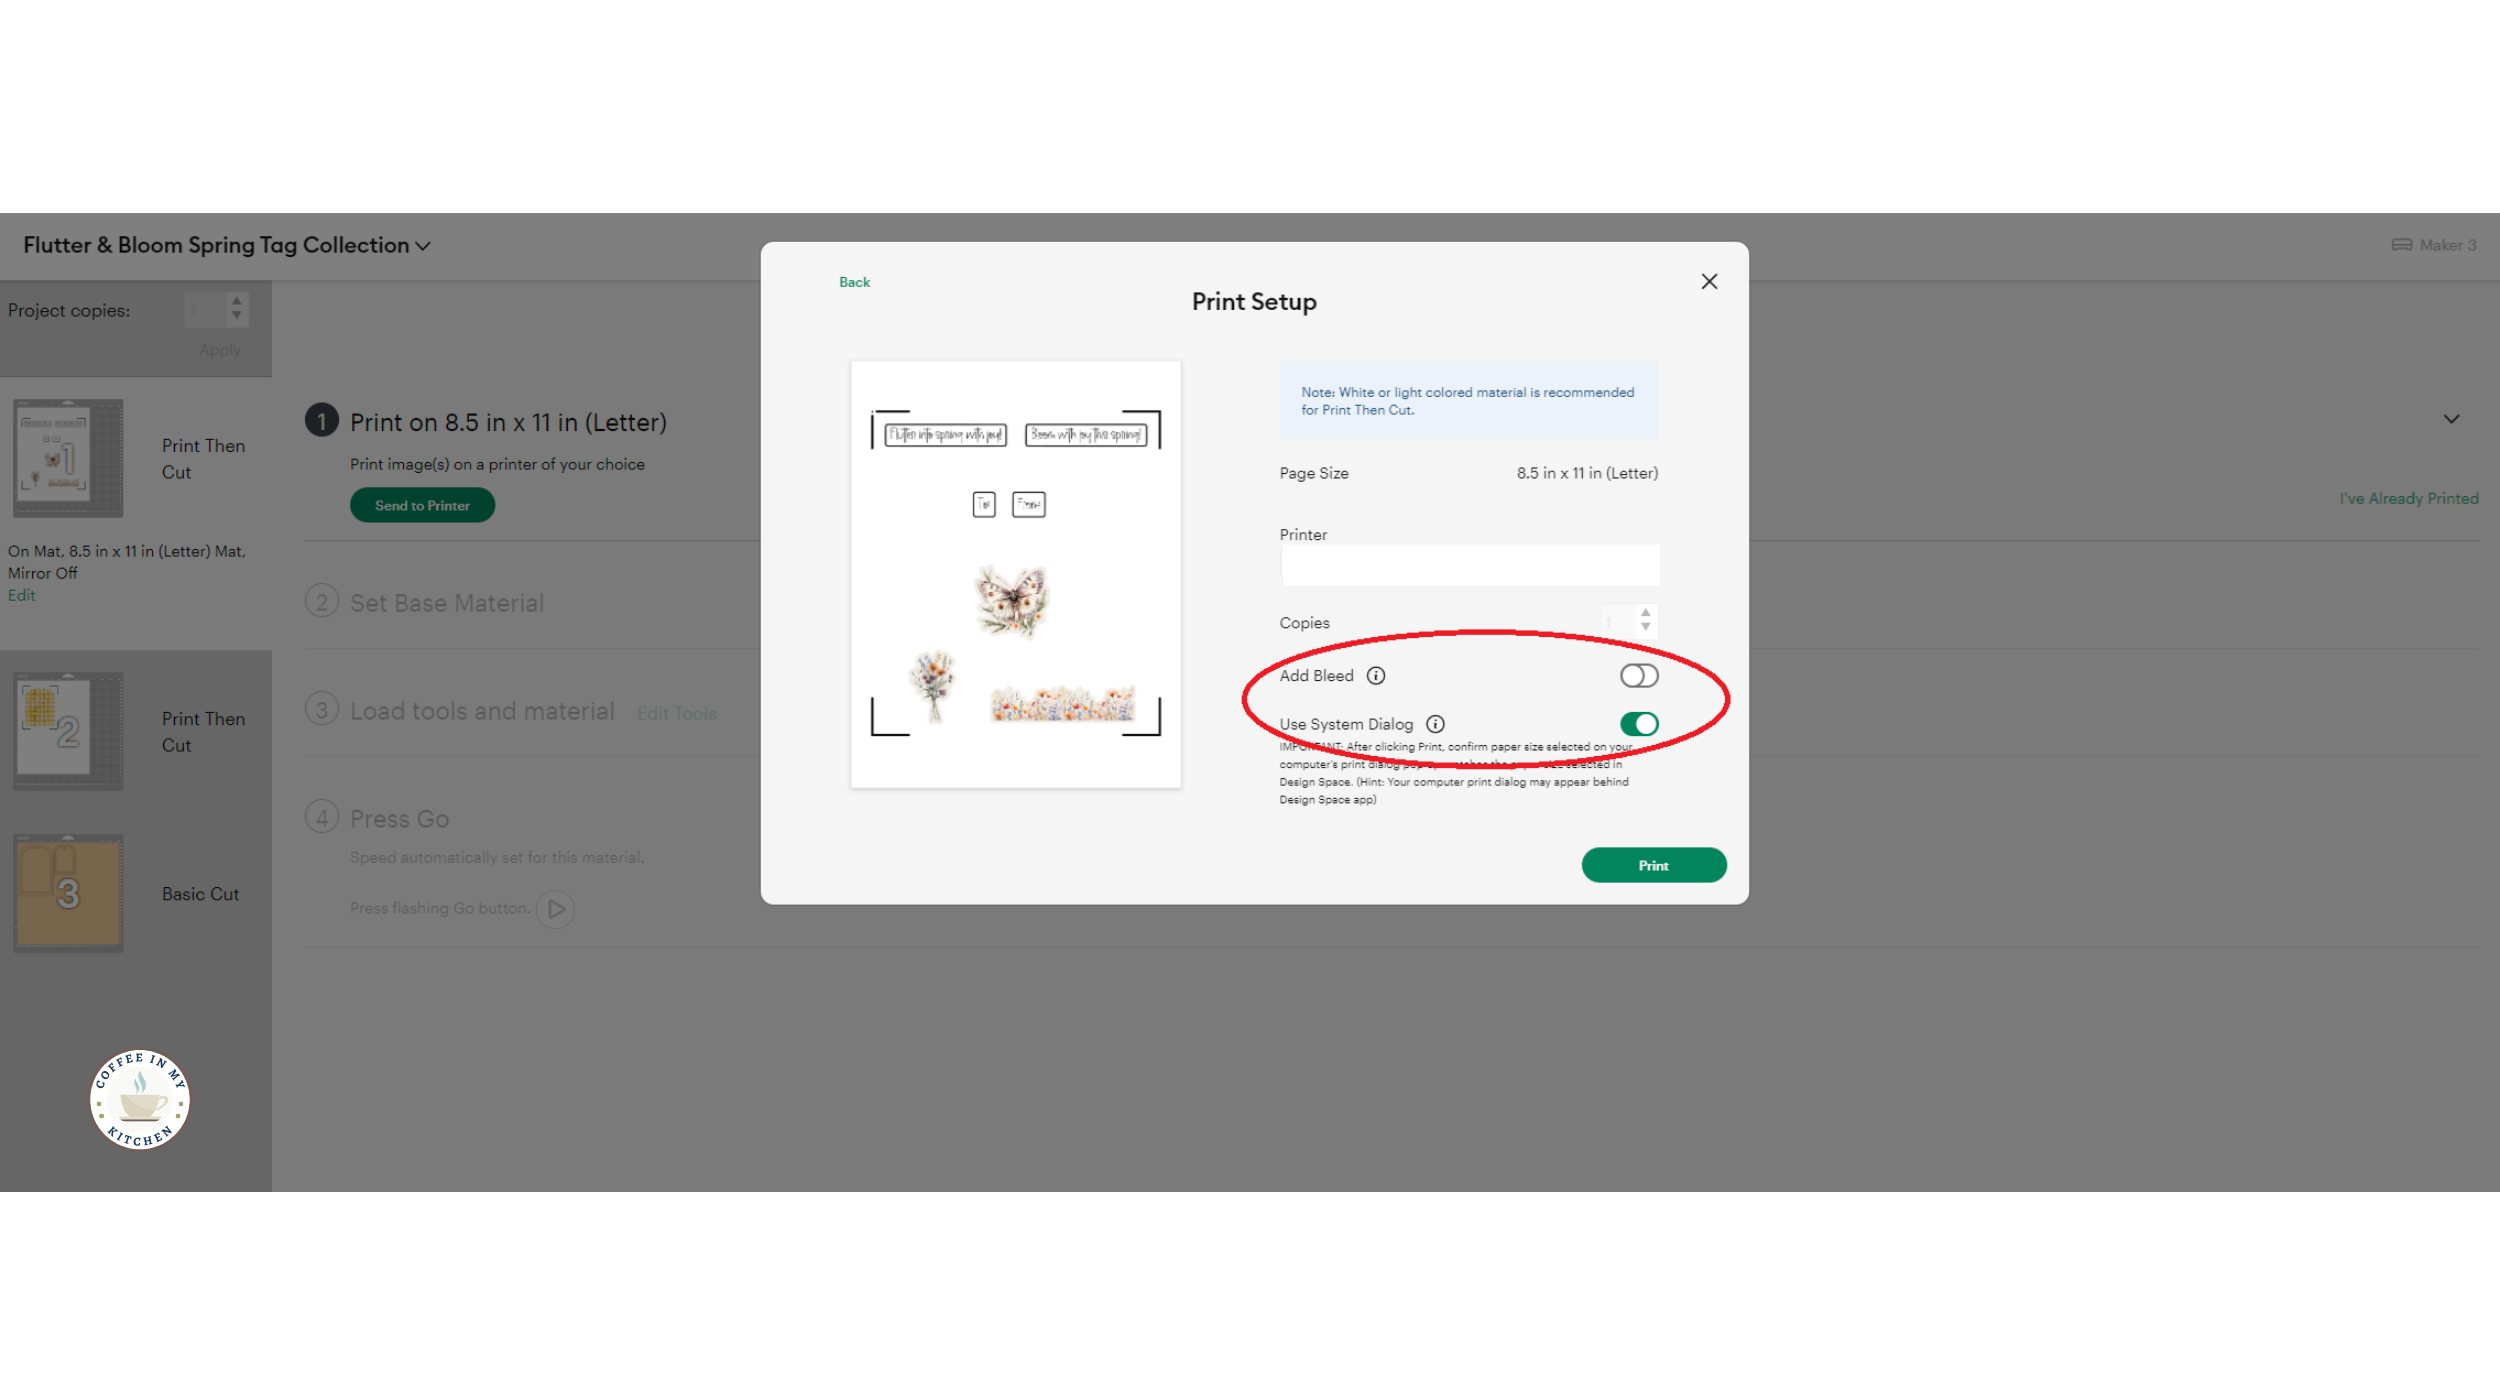
When the Print Setup box appears, select your home printer, then toggle the Add Bleed option OFF, and the Use System Dialog option ON.
NOTE: The Add Bleed option adds a slight print outline to each element, which causes the Cricut machine to cut a little extra around each piece. I’ve found with ephemera that the cut and the image outlines don’t always align, so I prefer to keep the Add Bleed option off for a cleaner cut. However, feel free to play around with this option if you’d like to see how it works with your Print then Cut projects in the future!
When the System Dialog box comes up, click on Preferences. This will open up another print option box where you can select the print quality for this print.

I like to select Best for the Print Quality when printing out a project in color. You can also look for Highest DPI or Highest Quality under the Advanced tab, depending on what kind of printer you have.
For more printer tips for Print then Cut crafts, see the FAQs article HERE!

Once you’ve selected your print quality, follow your printer prompts to print the page!
While the printer works on the elements page, Design Space will pop up the Verify Print Quality box, telling you how your final printed page should look with the black corner guides (see the picture below).
Once the page is finished printing, compare it to the info box. If it looks good, click Continue to move on to the next step.
If the page doesn’t look right or the black corners aren’t aligned correctly, you can go to Cricut.com and search for their Print then Cut troubleshooting tips. I recently had to follow the steps to realign my Maker 3 machine, which helped with my print projects!

To begin the cutting phase, select Medium Cardstock 80lb (216 gsm).
NOTE: I’ve recently found that selecting the Medium Cardstock while using 65lb (176 gsm) cardstock makes for a cleaner cut. I’m unsure if my blade is getting dull and the heavier pressure helps with the cut or if my preferred cardstock paper choice is just a little heavier than 65lb, but it works for my projects. Feel free to play around with the Light and Medium Cardstock selections to see which works best with your particular cardstock and blade!

If you don’t have it already bookmarked, select Browse All Materials and scroll down the menu until you get to the Paper category. You’ll see the Medium Cardstock option there, and you can click on the bookmark icon to save it to your main menu for future projects.

Now, follow the prompts in Design Space to prepare the Cricut machine for the cutting process.
I keep my Pressure on Default for my Fine-Point blade, but you can select More in the drop-down menu if you have an older or dull blade. This will help the blade to cut cleanly around the project pieces.

Take the light grip mat and the first piece of white cardstock with the ephemera and sentiments printed. Carefully line up the paper within the mat grid and press down, using the brayer tool to firmly smooth and secure the paper to the mat.

When prompted, load the mat into the machine for alignment and press the blinking Load/Unload button. When the machine is ready, press the Play button. Now, you can sit back and relax while the machine goes through its cutting process!
When the cut is finished, press the Unload button to release the mat from the machine.

Continue following instructions to unload and load the remaining papers and mats, matching the Print then Cut pages and yellow color cardstock paper with the order in Design Space. Follow the above printer directions again if needed for the second Print then Cut page.
Select the Medium Cardstock again for the yellow cardstock.


Step Three - Assemble the Tags, Ephemera, and Sentiments
Once the cardstock paper has been cut, carefully remove the excess paper from the design and the mat. I find it easier to bend and gently roll the mat away from the paper instead of pulling the paper away from the flat mat.
Use the weeder tool and the tweezers to help remove the smaller pieces from the mat.


For the yellow tags, I found that using the scraper tool worked fantastically in gently pushing the small paper dots off the mat!


Now comes the fun part! Let’s gather the decorative supplies, and I’ll show you some lovely examples of crafts you can make with this fantastic tag collection!
Part Two: Instructions for Hand-Cut Crafters
Step One - Download & Print the Tag Collection JPG Printables
Locate the Flutter & Bloom Spring Tags Freebie Pack folder on your computer and double-click to Open. Select these files and print them out onto white 65lb (176gsm) cardstock.
Ephemera and Sentiments JPG
Golden Honey Color Set Printable JPG
Golden Honey Gingham 1 JPG (for future projects, feel free to use any of the JPG digital paper files to create a variety of Golden Honey tag designs!)
If you need assistance opening the project zip folder, printing the JPG files, or learning about best print practices, check out our FAQs article HERE!
Next, we’ll set up the Golden Honey Accent Set Printable as a template to print onto the Gingham pattern paper to create a set of pattern tags.
To do this, go into the Tag folder, pull up the Golden Honey Accent Set Printable, and prepare it to print. Load the printed Gingham paper into your printer feed and make sure that the printer will print the Accent printable right onto the Gingham design, creating a tag template on the patterned paper.
NOTE: If you’d prefer to use yellow cardstock instead of printing out the Golden Honey Color Set Printable, use the Accent Printable in Black and White/Grayscale to print a template on top of the yellow cardstock. You can also use the Accent Printable as a white tag collection with a yellow dot border!


Step Two - Cut Out the Tag Collection Pieces
Use detail-cut scissors and/or a paper cutter and/or a detail craft knife to cut out the tags, ephemera, and sentiment pieces. I used a mix of my paper cutter, scissors, and craft knife for everything.
NOTE: I created the printable tag pieces with the idea that the dot border would just be decorative, and one wouldn’t need to cut out all those tiny dots by hand. This makes the final design a bit different from the cutting machine version, but skipping this part will save your hand, and it looks fantastic as a printed detail border!

Now comes the fun part! Let’s gather the decorative supplies, and I’ll show you some lovely examples of crafts you can make with this fantastic tag collection!
Part Three: Final Tag Assembly Instructions for All Crafters!
Tag Collection Craft One: Flutter & Bloom Spring Greeting Card


Take the card panel, a 4.25 x 5.5in card base, a floral bouquet ephemera piece, and a sentiment. Use foam glue dots to adhere the pieces to the card base, arranging them as you like!
Tag Collection Craft Two: Flutter & Bloom Spring Gift Tag


Take the gift tag, the “To” and “From” sentiment, and a small length of blue ribbon. I also used a scrap piece of leftover Gingham pattern paper and a small flower craft punch to cut out small floral accents.
Use white glue with a precision tip to adhere the sentiment pieces and any extra accents to the tag. Use the scissors to trim any edges if necessary.
Finally, thread the blue ribbon through the top tag hole and tie the ribbon into a knot or a bow!
Tag Collection Craft Three: Flutter & Bloom Spring Journal Card/Bookmark


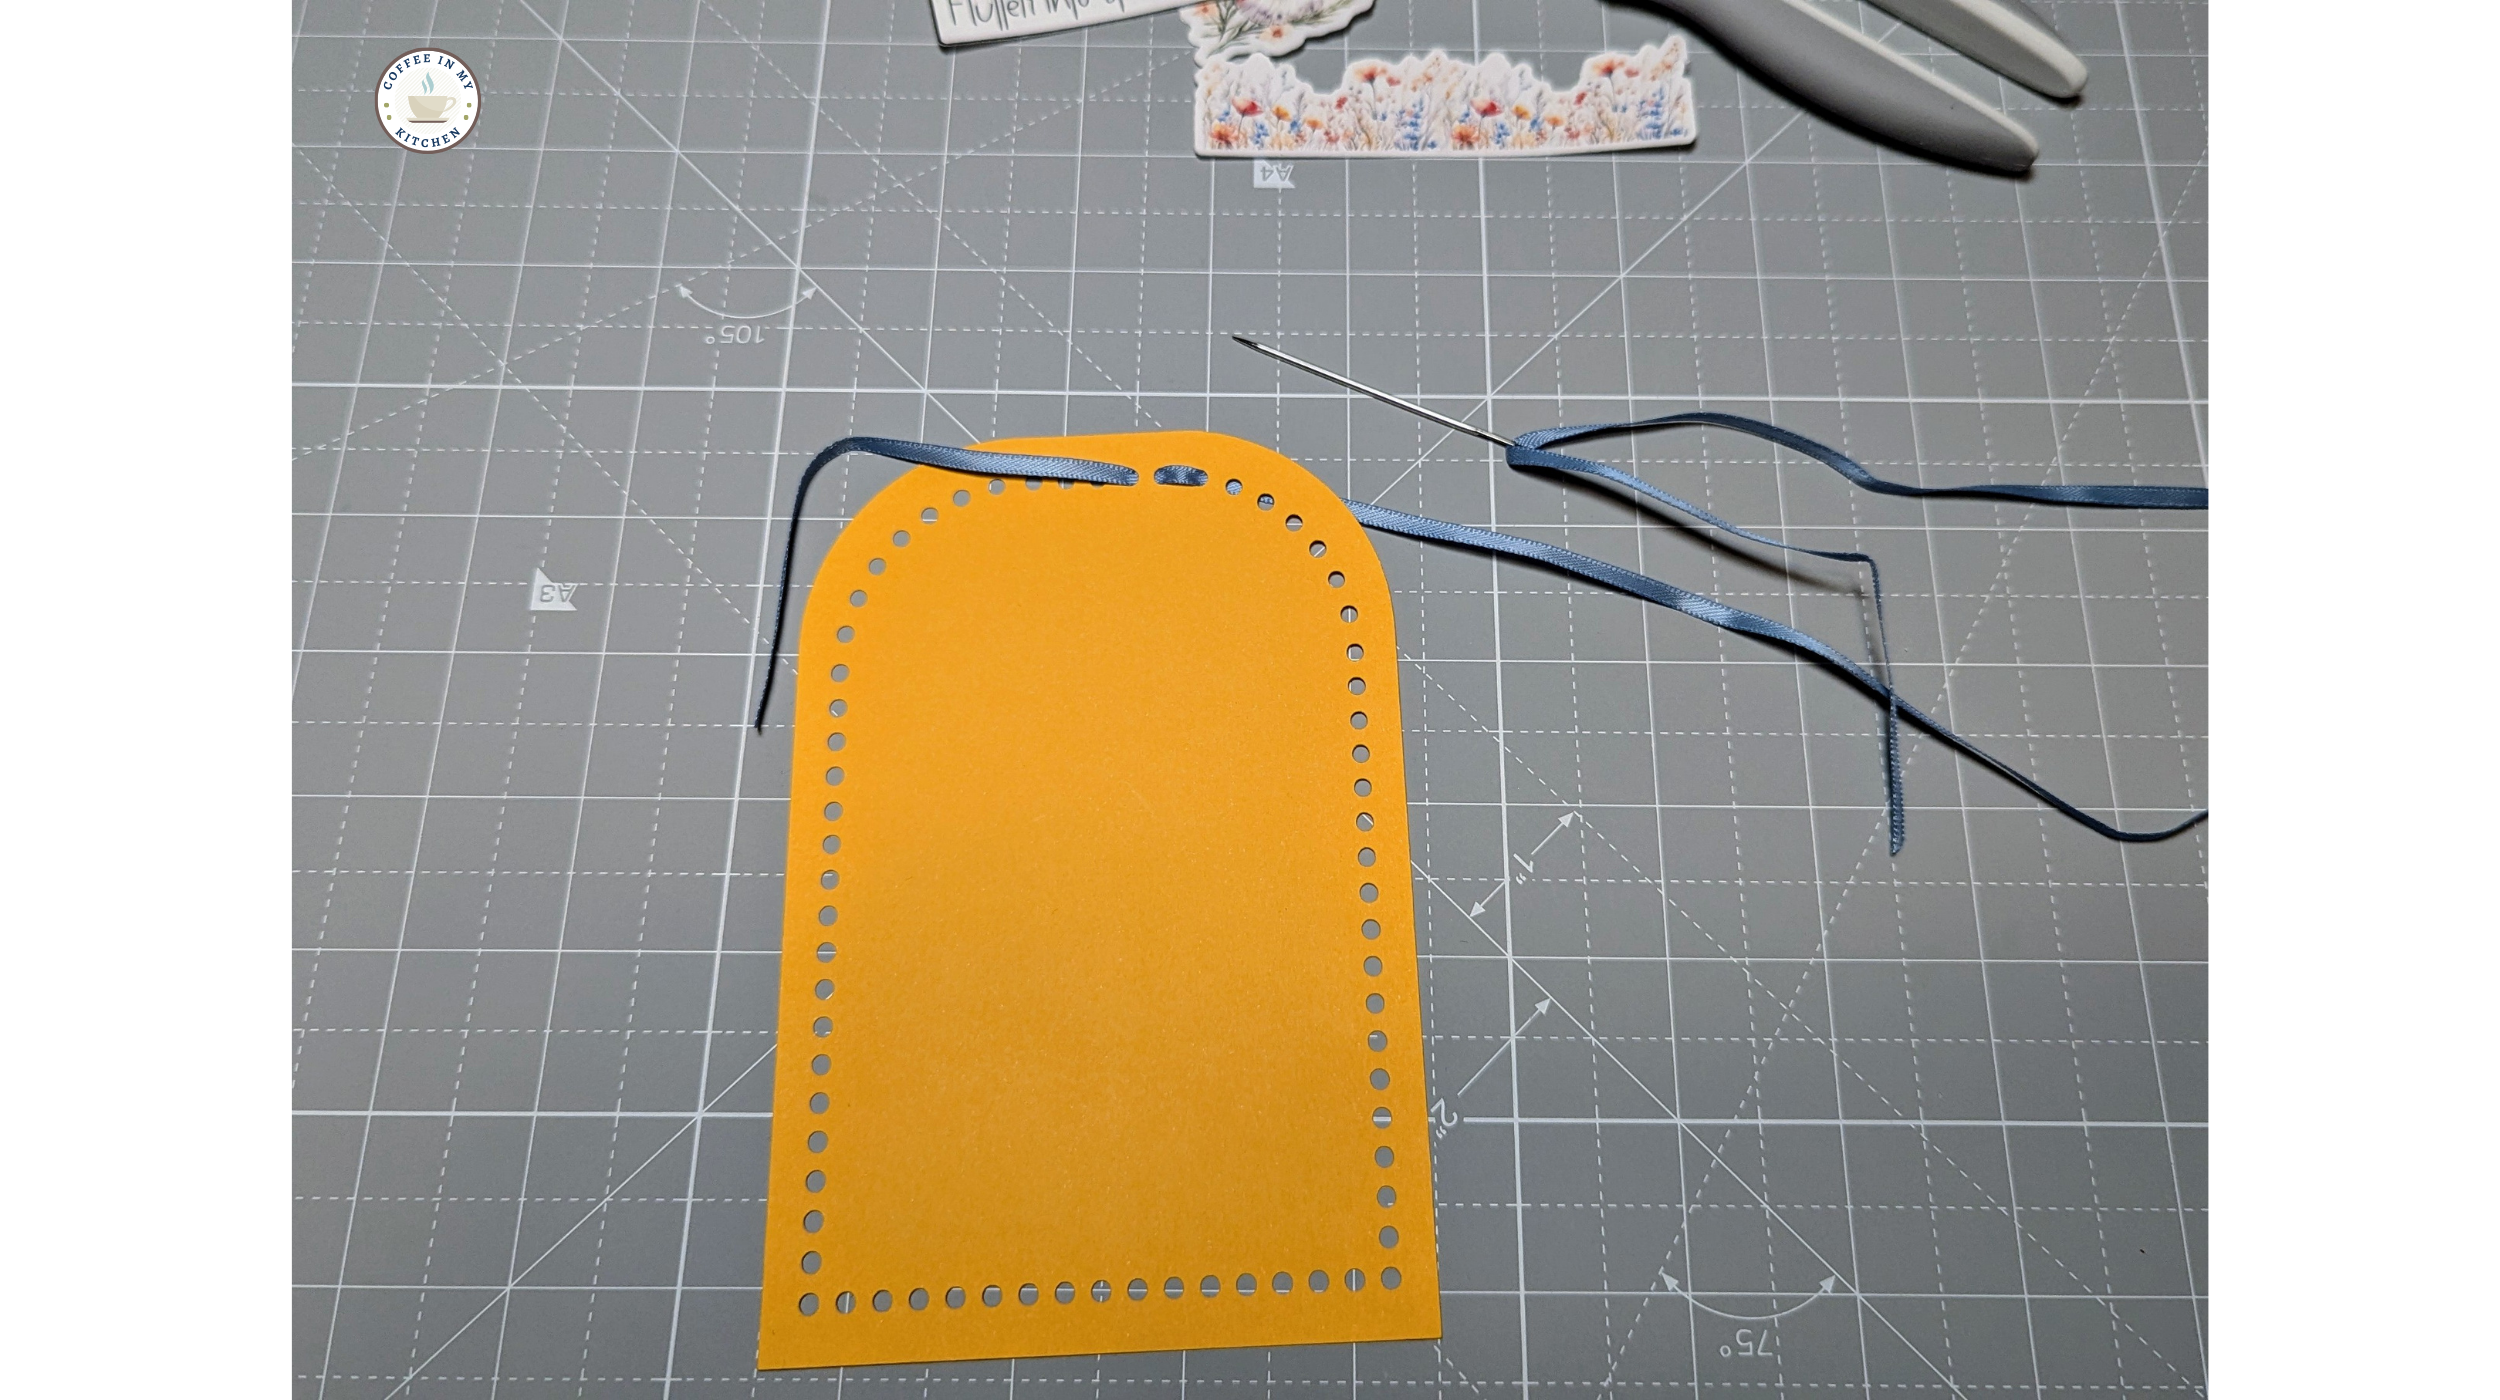


Take the 4x6in Journal Card piece, a butterfly and wildflower border ephemera pieces, a sentiment, and a long length of blue ribbon.
Thread the blue ribbon through the eye of a large embroidery needle. Carefully “sew” through the journal card dot border, one or two dots at a time, ensuring that you leave a small length of ribbon at the top of the card. Once the ribbon is threaded through the entire card, take the two ends and tie a bow at the top of the card.
Use the scissors and glue to trim down and adhere the wildflower ephemera piece to the bottom of the card. Repeat with the sentiment.
Finally, use the foam glue dots to adhere the remaining butterfly ephemera piece to the top of the card - how lovely!
Spring is the perfect time to refresh your creativity, and the Flutter & Bloom Spring Tag Collection makes it easy to add a touch of seasonal beauty to your crafts. Whether you're creating gift tags, bookmarks, journal accents, or greeting cards, these versatile templates bring butterflies, wildflowers, and soft golden hues to your projects!
I can’t wait to see what you create! Get your free Flutter & Bloom Spring Tag Collection from our Freebie Vault today, and be sure to share your beautiful crafts with me—I’d love to see how you bring these designs to life!


Looking for even more ways to craft with these tags? Don’t forget to check out the Flutter & Bloom: Spring Tag Expansion Pack for even more coordinating tags, ephemera, and digital papers in Dusty Rose and Powder Blue to take your spring crafting to the next level! Get the Expansion Pack in our Shop!
Conclusion & Next Steps:
Wrapping Up: Let’s Stay Connected!
I hope you had as much fun making this Flutter & Bloom: Spring Tag Collection Pack as I did! Handmade gift tags, greeting cards, and journal cards or bookmarks are such a thoughtful way to share love and creativity, and I’d love to see how yours turned out. Whether you followed the tutorial exactly or put your own unique twist on it, I’d be thrilled if you shared your creation!
Tag me on Instagram or Facebook with @coffeeinmykitchen or post your project in the Coffee in My Kitchen private crafting Facebook group—it’s a wonderful space to connect with fellow crafters, share inspiration, and get ideas for future projects.
Looking for more creative projects, freebies, and exclusive craft ideas? Be sure to sign up for my weekly newsletter through the Vault Box below to get all the latest updates, tutorials, and special goodies straight to your inbox.
Want to explore more digital crafting supplies? Check out my shop for more digital paper packs, card kits, and printables to inspire your next project.
Happy crafting, and I can’t wait to see what you create!